






INTRODUCTION
This manual describes the main functions that can be viewed and changed by accessing the FRITZ!Box 7430 router with Firmware version 7.
You can access the user interface of the FRITZ!Box router through a web browser, from a computer or from mobile devices such as tablets and smartphones. Through the user interface you can configure the device, enable/disable functions and obtain information on the status of the router and of your connections.
HOW TO ACCESS
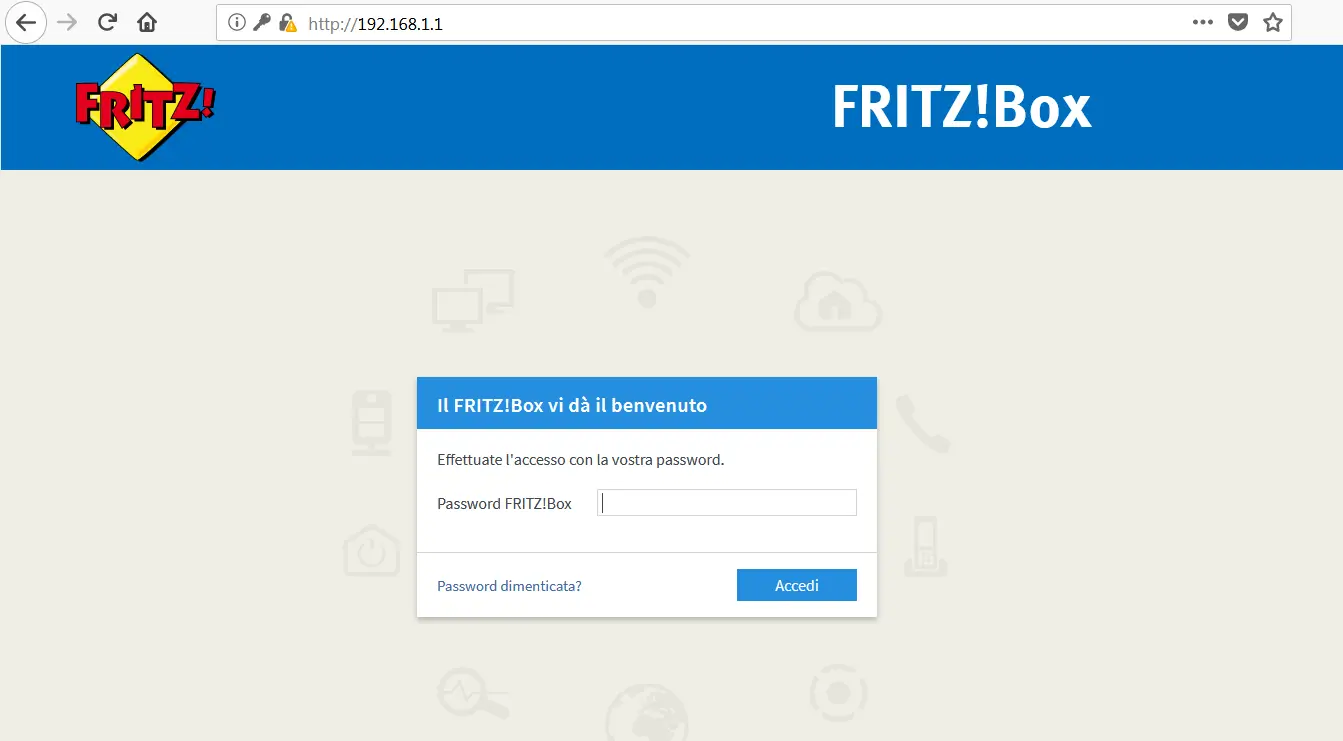
To access the user interface, connect a device such as a PC, smartphone or tablet to the router, by cable or wirelessly.
- Open the browser you use for browsing (safari, firefox, edge, chrome);
- In the address bar, type http://192.168.1.1;
- Enter the Password shown on the grey label underneath the router and click Registrazione (Log In).
OVERVIEW
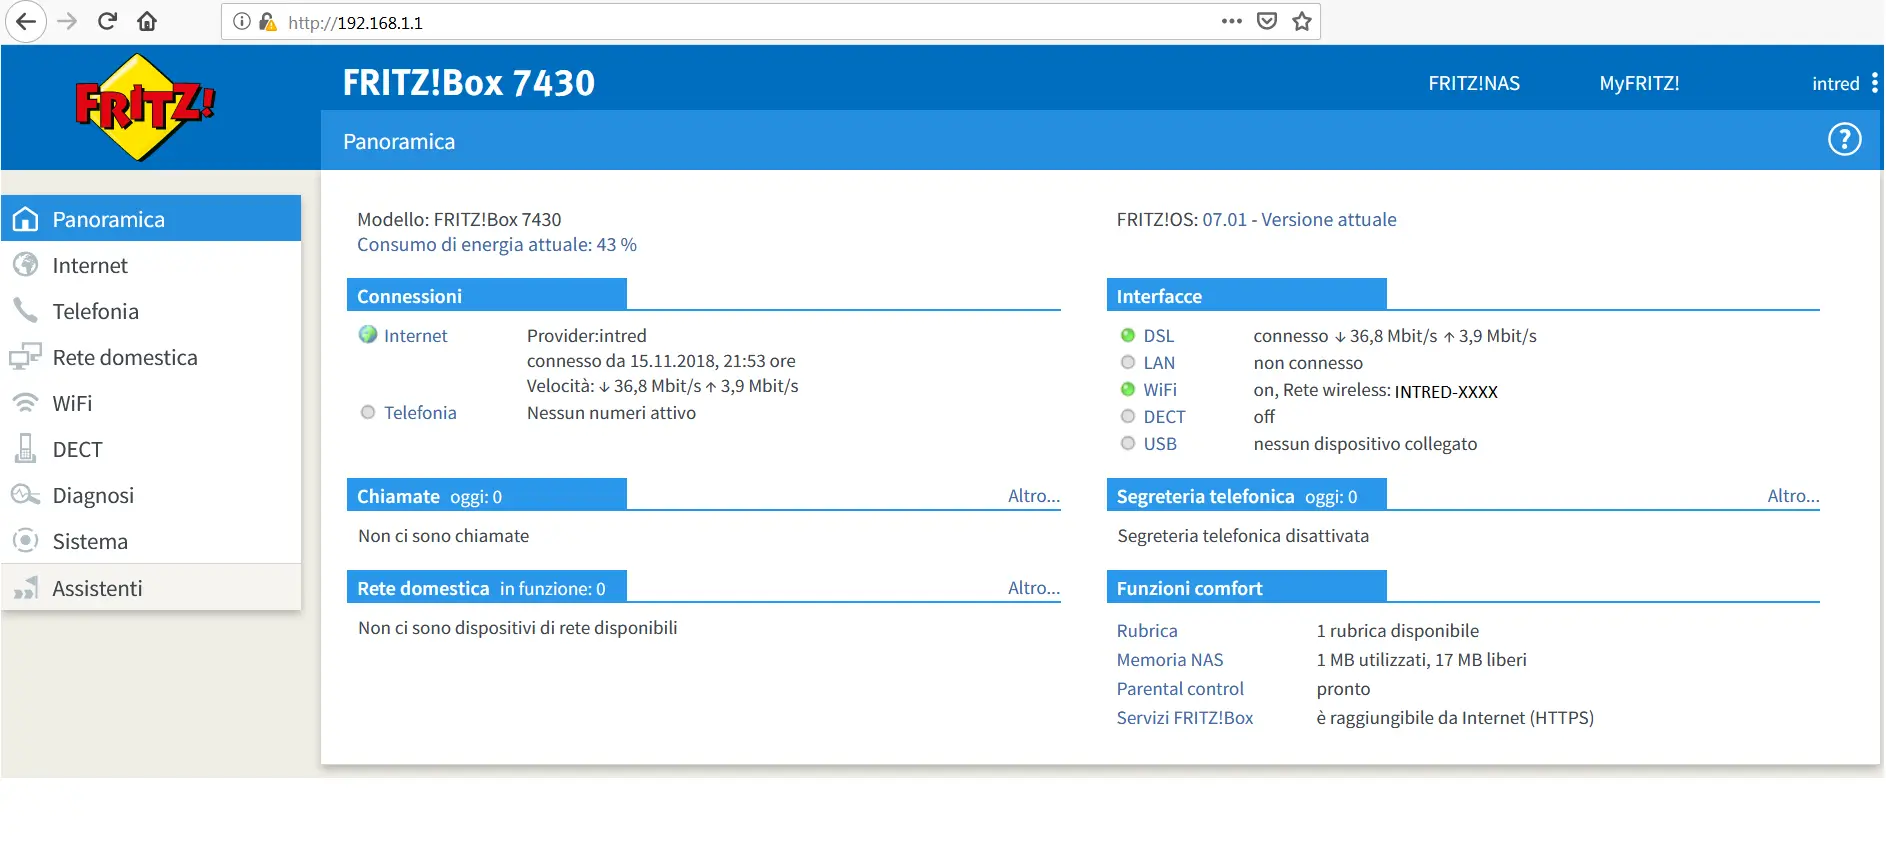
The main overview screen of the router shows all the information about the FRITZ!Box router.
This screen shows the FRITZ!Box model and the operating system version. If the device is updated to the latest version, the words "Versione attuale" (Current version) will be shown. Otherwise, if updates are available, a clickable link with the words "Aggiornamento disponibile" (Update available) will be shown.
The central part of the window shows all the general information on the status of the line, including:
- Connessioni e Connettività (Connections and Connectivity): information on links and connections;
- Chiamate (Calls): list of the latest calls made or received (the data is only shown if the telephone service with EIR is active);
- Segreteria telefonica (Answering machine): the answering machine service is not active;
- Rete domestica (Home network): information on the devices currently connected to the router. The word WLAN next to a device indicates that it is connected wirelessly, while the word LAN indicates that it is connected by cable;
- Funzioni comfort (Comfort functions): value-added services; for more details, you can consult the device’s full user manual, available at the following address: https://assets.avm.de/files/docs/fritzbox/fritzbox-7430/fritzbox-7430_man_it_IT.pdf
HOME NETWORK SECTION
SCHEMA RETE (NETWORK)
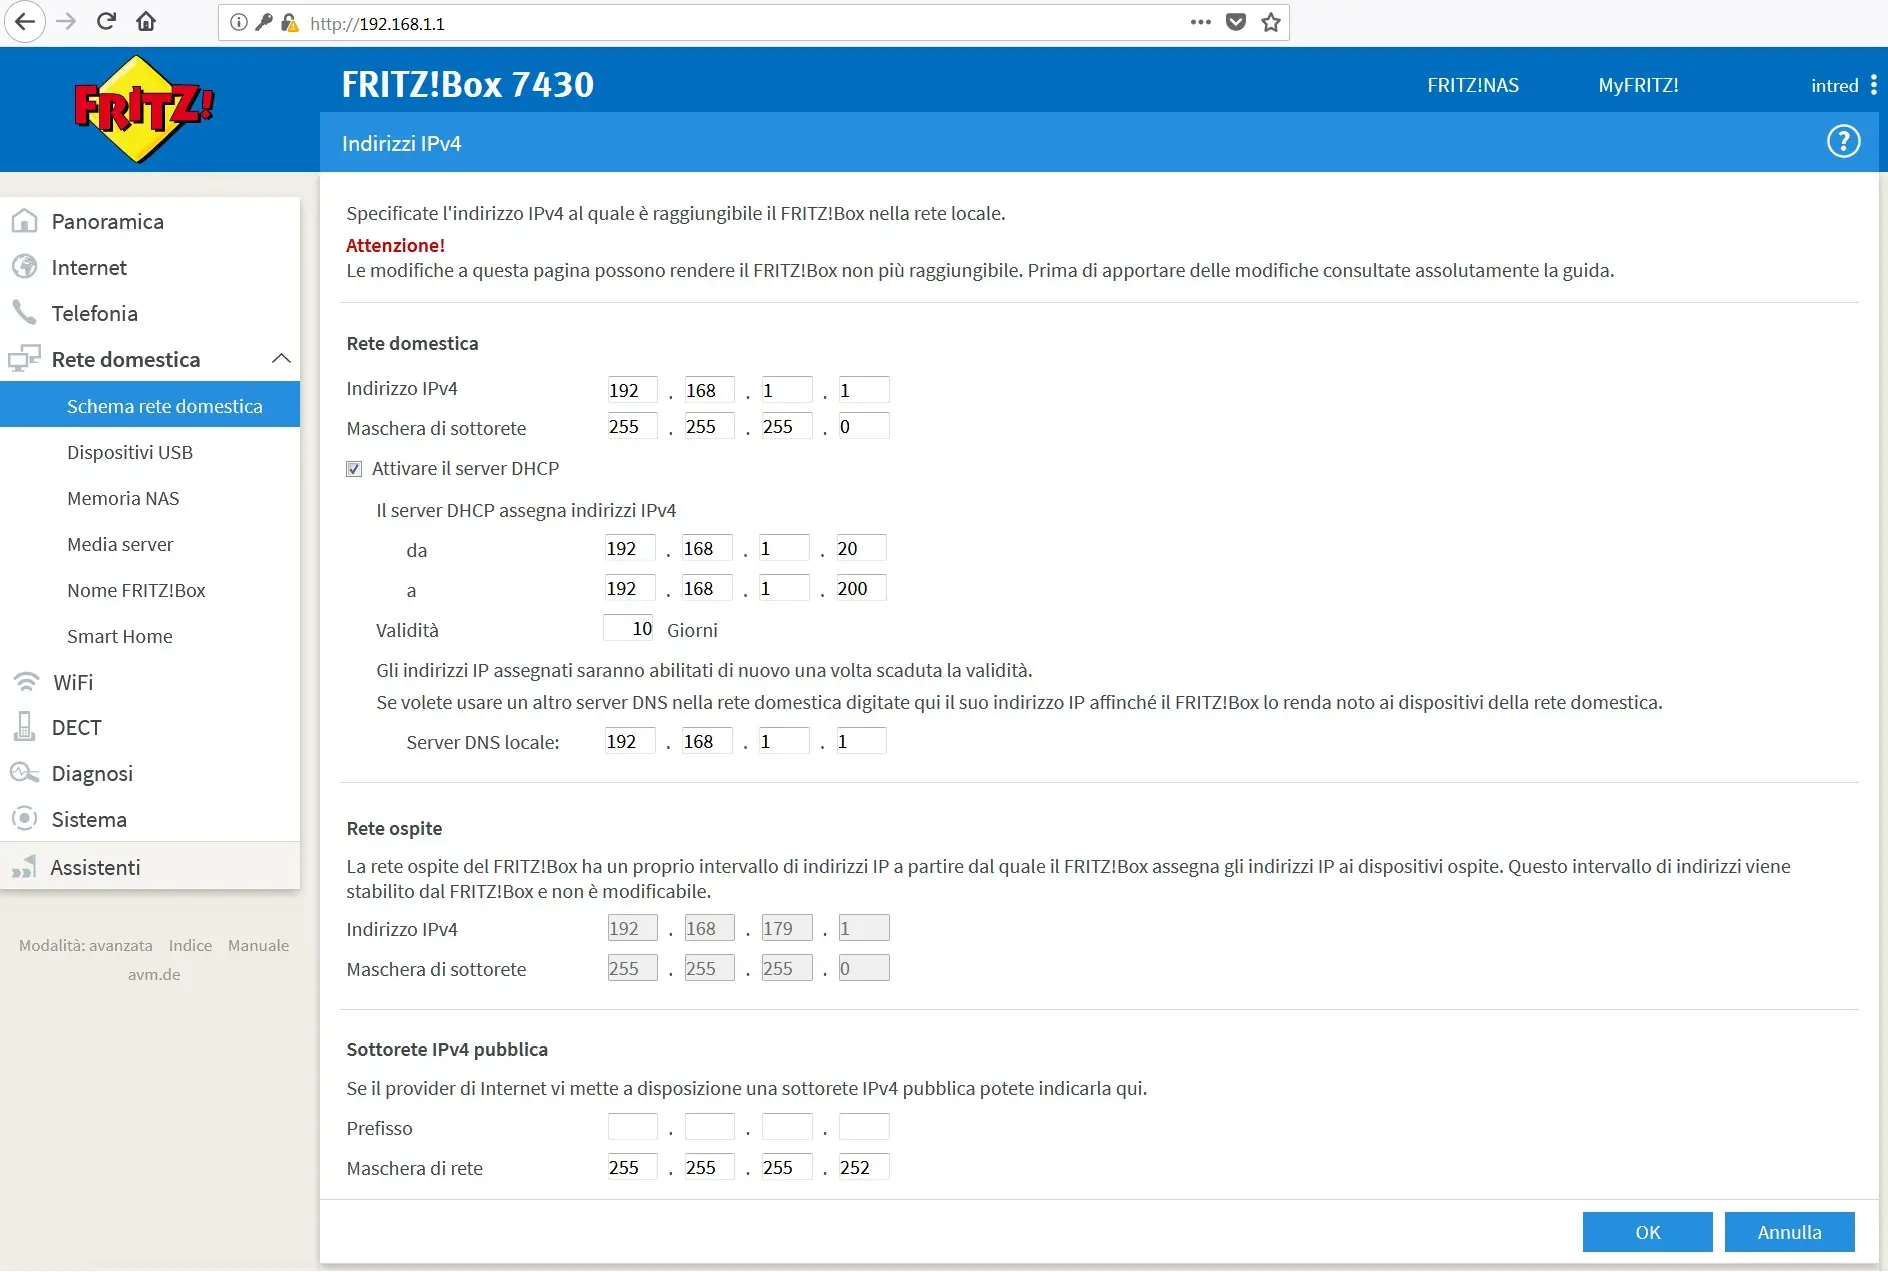
In most home networks there is no need to change the LAN settings, and all devices connected to the router should be able to browse normally. Only change the IP addressing data if your network has specific requirements. Please note that changing these parameters could cause one or more devices on the network to malfunction, so we advise against changing the settings on this screen unless you have in-depth knowledge of the subject.
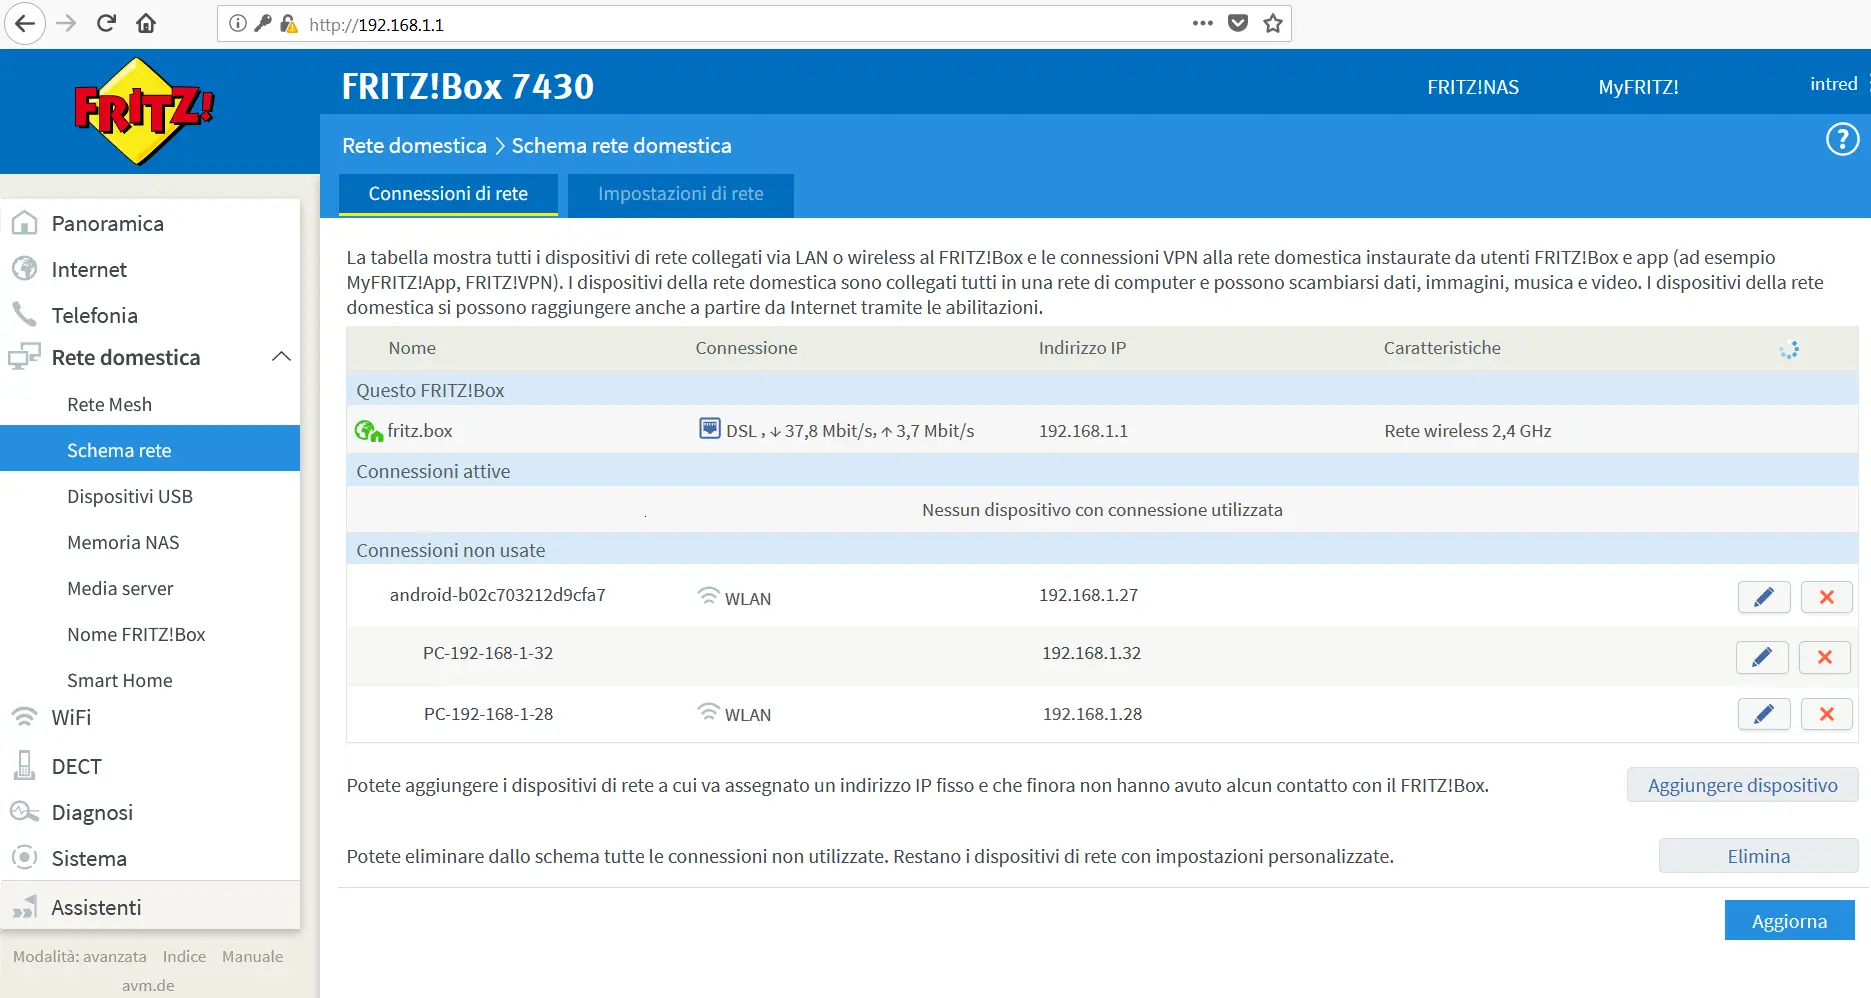
To change the network settings, in the menu bar on the left click Rete domestica (Home Network) -> Schema rete (Network).
The first section, "Connessioni di rete" (Network connections), shows all the devices that have connected to the router at least once. You can change a device’s parameters using the pencil icon on the device’s row. You can also remove the device from the network using the red X icon on the corresponding row.
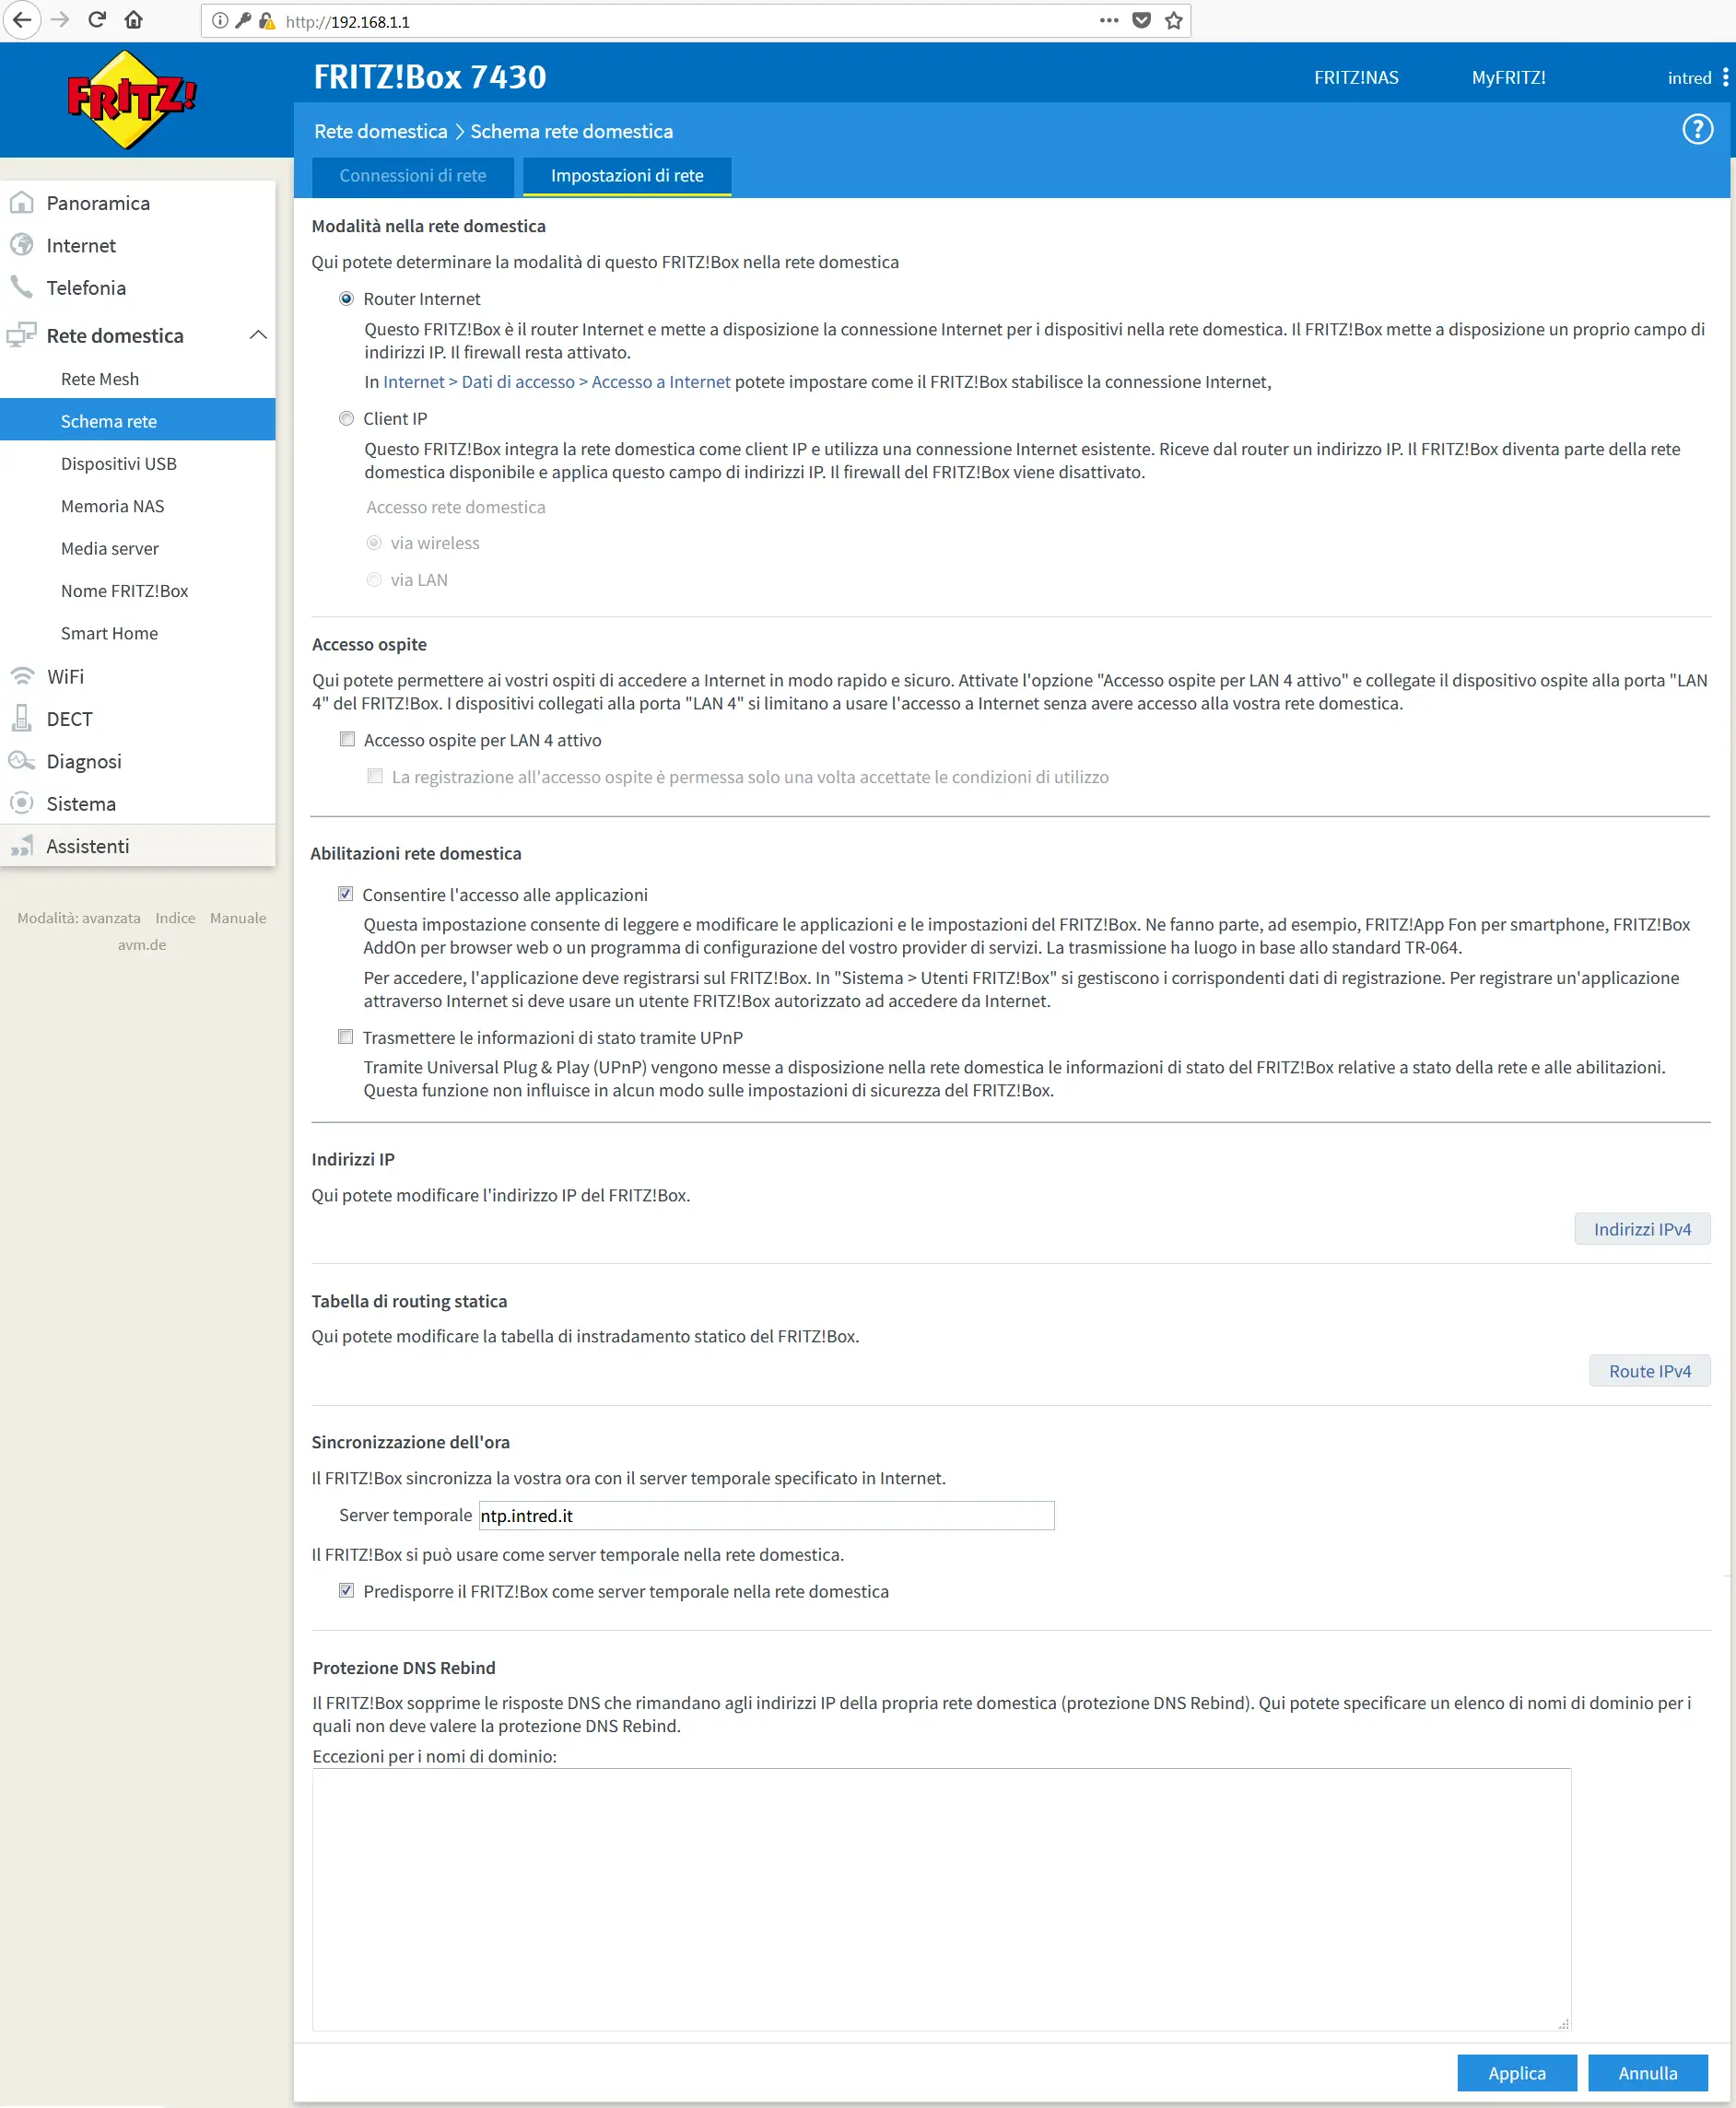
To change the LAN settings, click Impostazioni di rete (Network Settings).
Scroll down the page and click Indirizzi IPv4 (IPv4 Addresses) in the Indirizzi IP (IP Addresses) section.
If you intend to change other options and configurations in this section, you can consult the technical support section of the AVM website. Its search engine and FAQs provide all the information you need to configure this section. To access the site, use the following address: https://it.avm.de/assistenza/fritzbox/fritzbox-7430/panoramica/
The network mapping of the IP addresses currently set on the device is now shown.
Change the Indirizzo IPv4 (IPv4 Address) field, setting the IP address to be assigned to the router.
>Please remember that the Server DNS locale (Local DNS server) field must not be changed under any circumstances.
If you intend to change other options and configurations in this section, you can consult the technical support section of the AVM website. Its search engine and FAQs provide all the information you need to configure this section. To access the site, use the following address:https://it.avm.de/assistenza/fritzbox/fritzbox-7430/panoramica/
WiFi SECTION
RETE WIRELESS (WI-FI NETWORK)
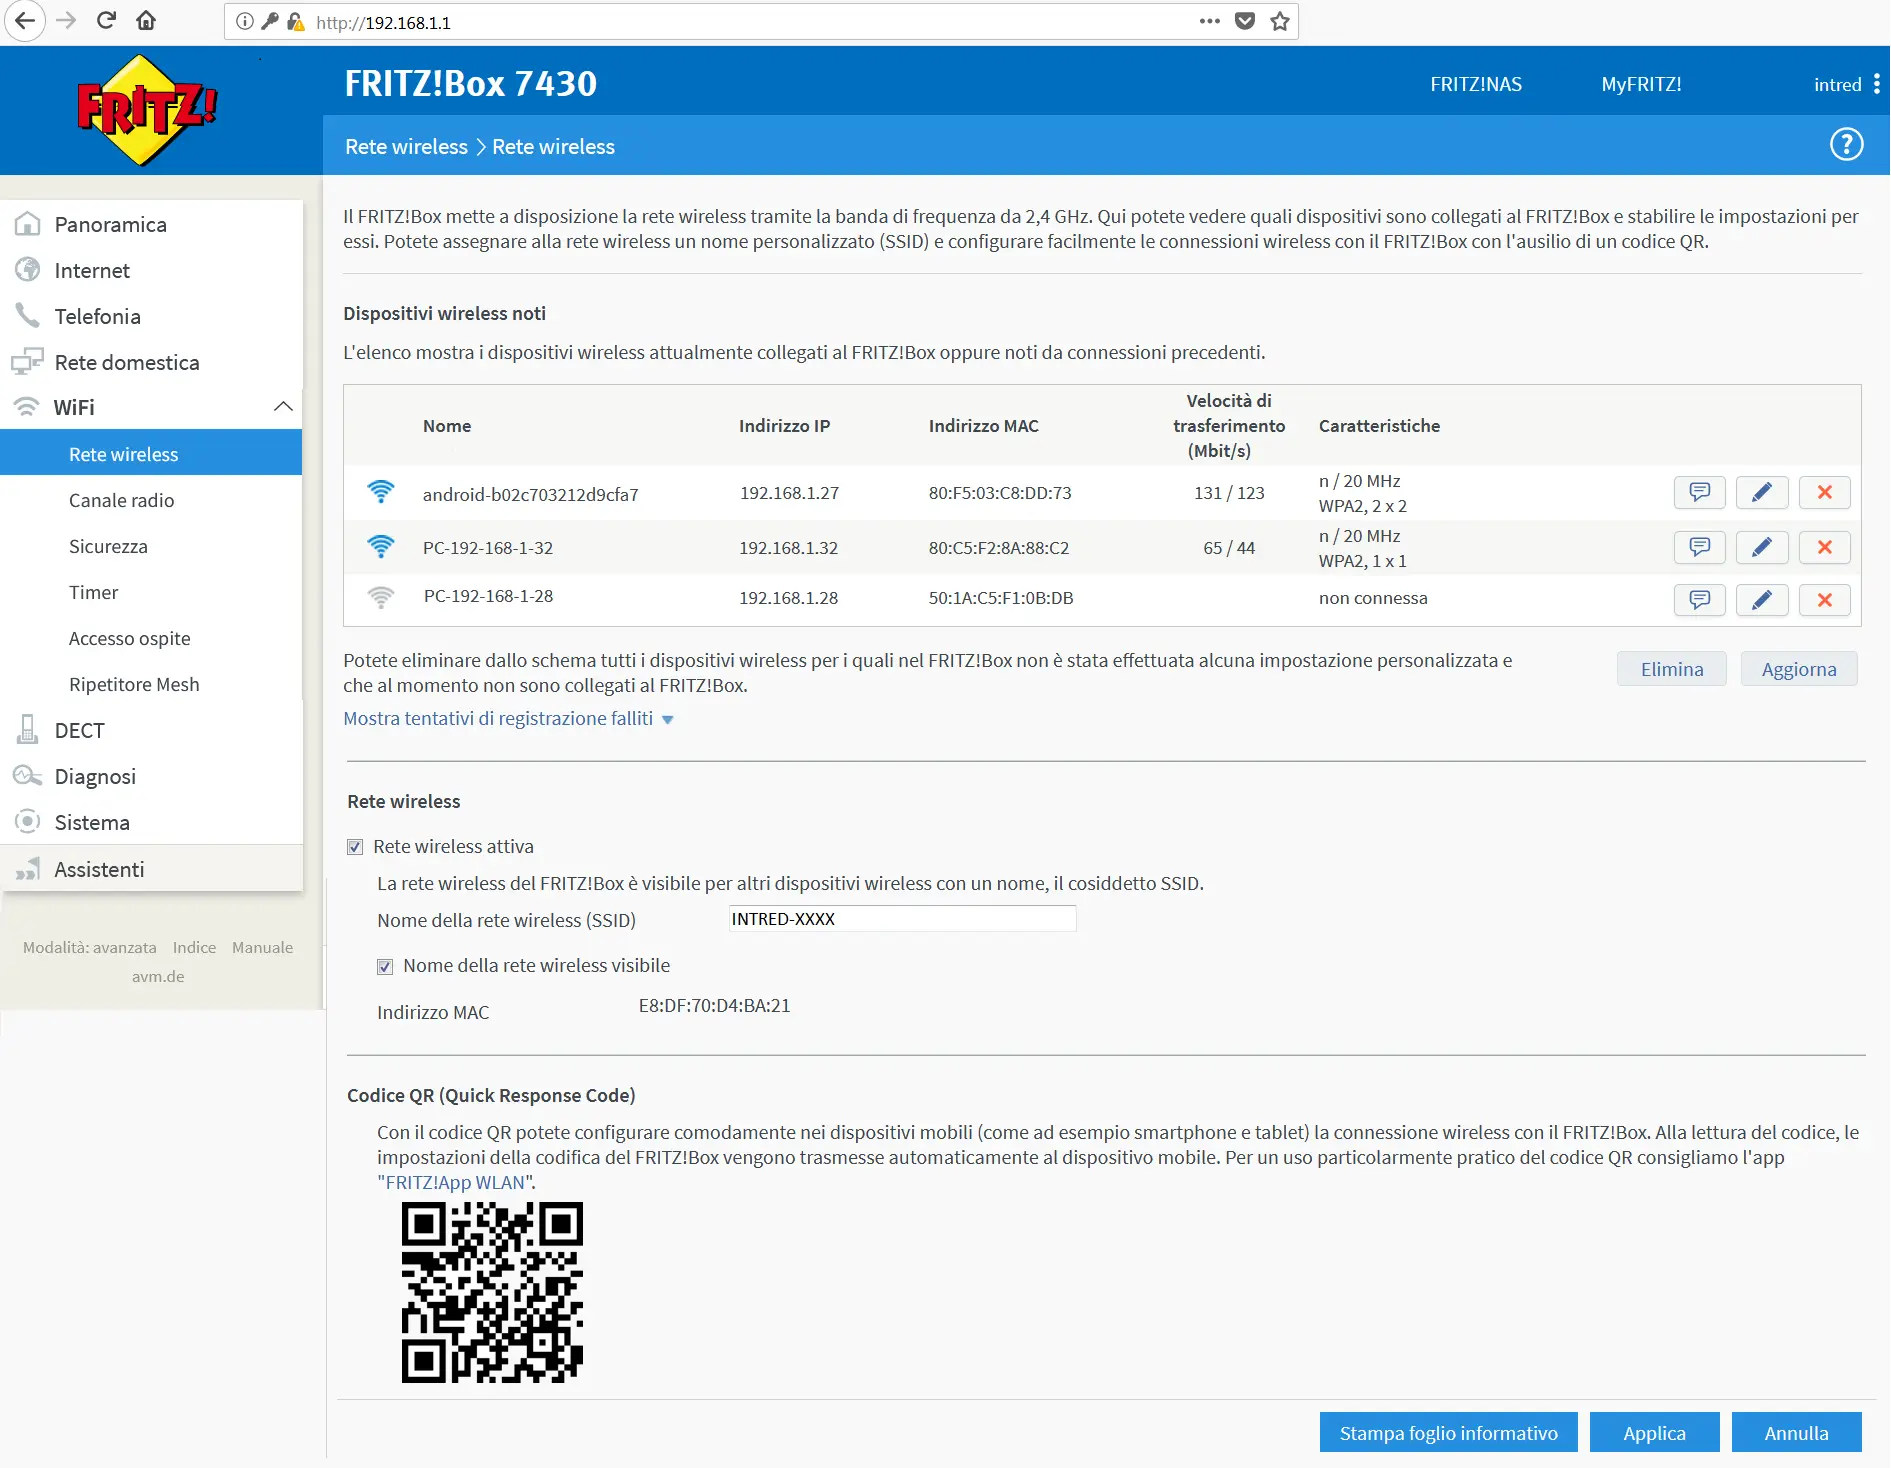
In this section you can view and change the settings for your wireless network.
In the menu bar on the left, click WiFi -> Rete wireless (Wi-Fi Network).
A screen will be shown listing all the devices that have paired with the FRITZ!Box router at least once (grey WiFi symbol) and the devices currently connected (light blue WiFi symbol).
Scrolling down the screen, in the Rete wireless section, you can do the following for each of the two available networks:
- Enable or disable the network with the Rete wireless attiva (Wi-Fi network enabled) option;
- Change the network name (SSID): this name will then be displayed by devices when they search for the network;
- Decide whether to hide or show your network’s SSID with the Nome della rete wireless visibile (Wi-Fi network name visible) tick box.
Click Applica (Apply) for the changes to take effect.
RADIO CHANNEL
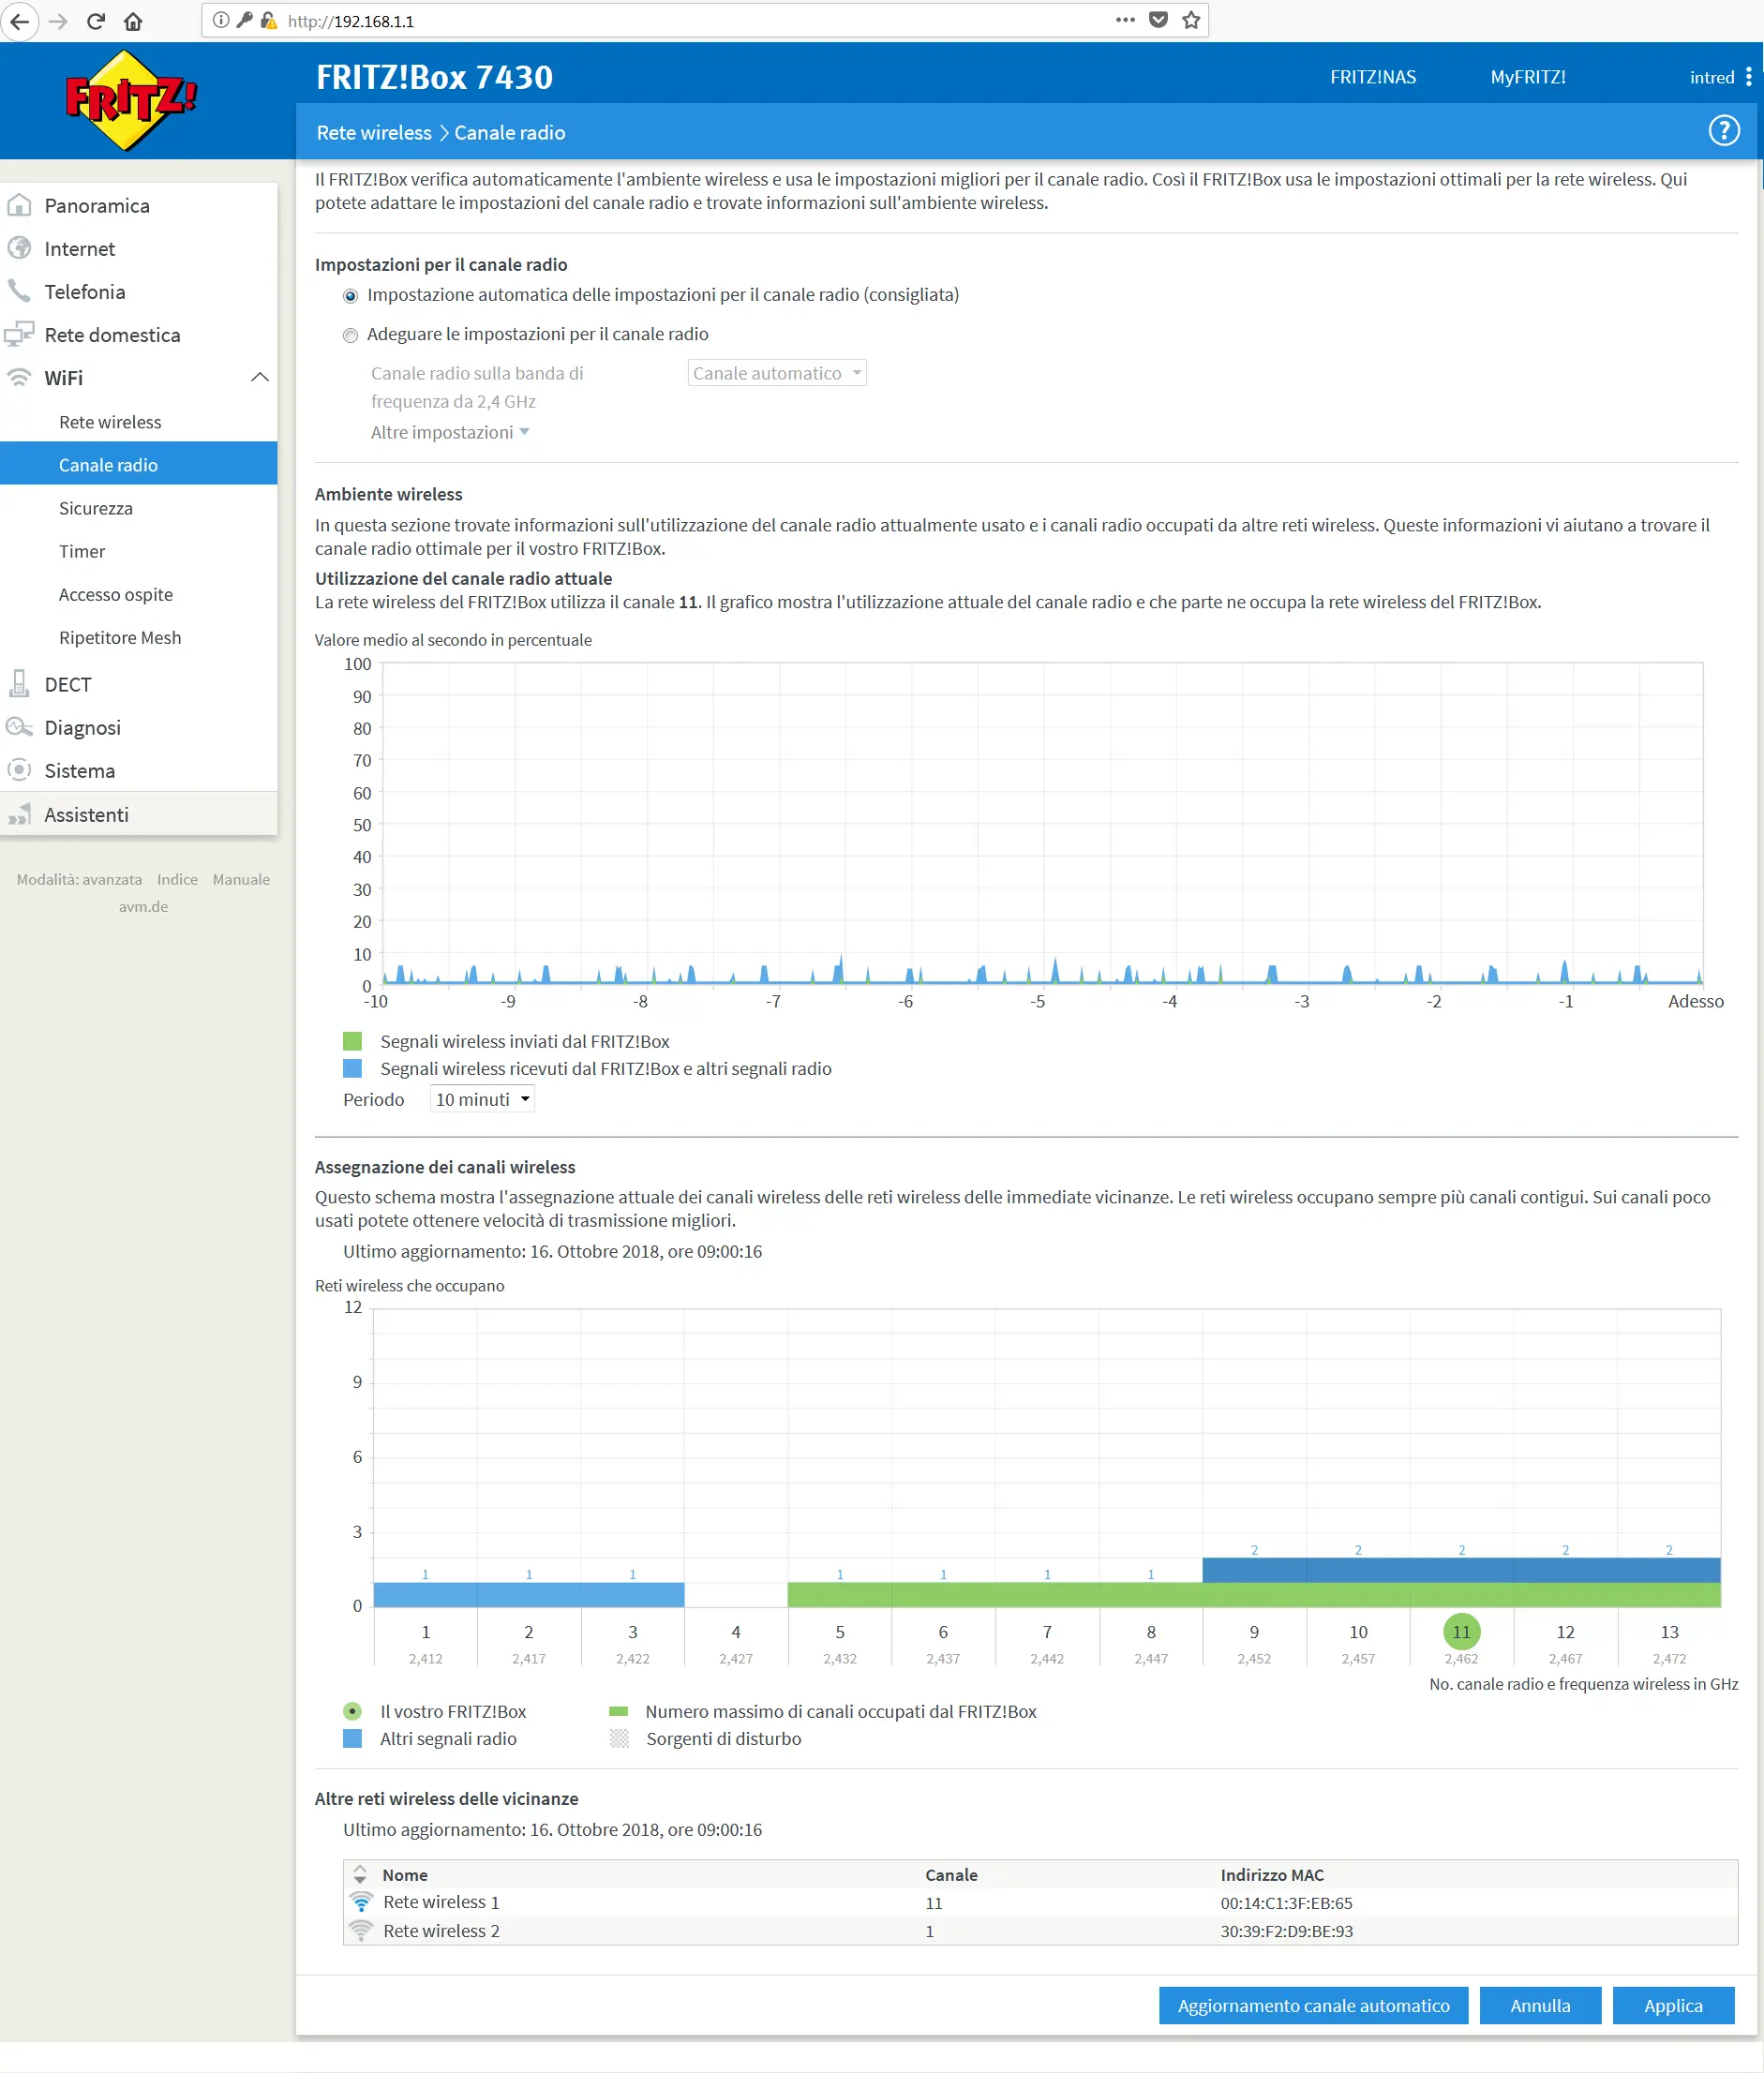
In the menu bar on the left, click WiFi -> Canale radio (Radio Channel).
The FRITZ!Box automatically checks the wireless environment and uses the best settings for the radio channel. The optimal signal configurations are already set by default.
Tick the Adeguare le impostazioni per il canale radio (Adjust radio channel settings) option if you want to change the transmission channel.
The drop-down menu will become active, from which you can select a channel between 1 and 13: preferably select the setting with the least overlap with existing networks. The recommended channels are 1-6-11, provided they do not already overlap with other networks and are therefore subject to interference.
Once you have selected the channel, click Applica (Apply): the chart showing the wireless channel allocation will change according to the channel set.
SECURITY
In the menu bar on the left, click WiFi -> Sicurezza (Security).
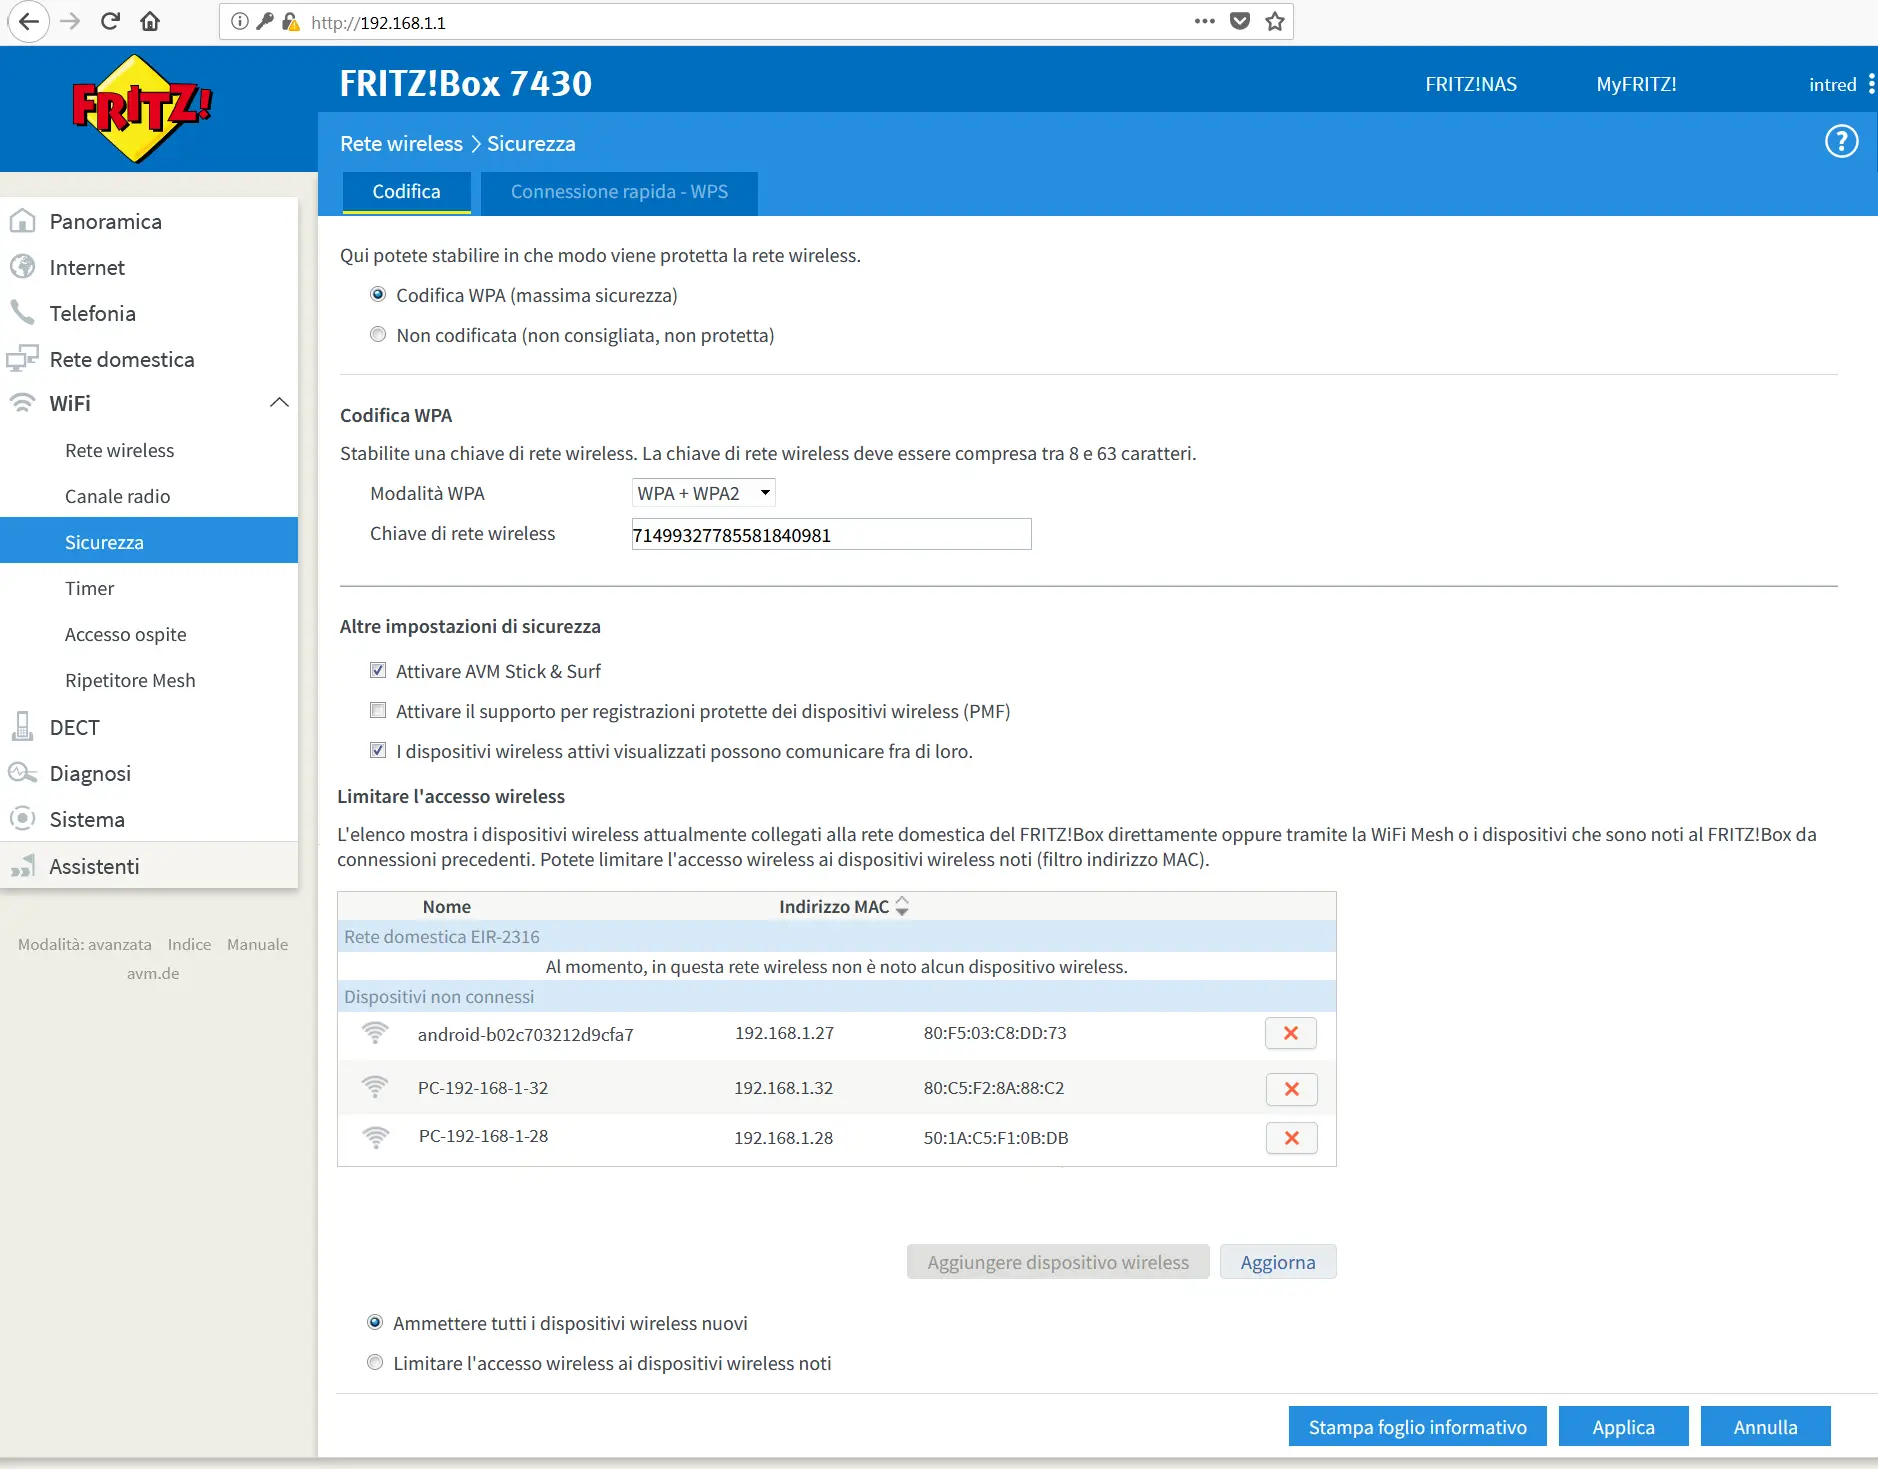
In this section you can protect access to the wireless network with an authentication password.
A password is already set by default, and is shown on the label on the back of the router next to WiFi Network Key.
From the settings on this screen you can:
- Change the Codifica WPA (massima sicurezza) (WPA encryption (maximum security)) option to the unencrypted option (non codificata (non consigliata, non protetta) – unencrypted (not recommended, not protected)): we advise against this, as it would allow anyone to connect to the network without having to enter a password.
- Change the encryption method: we always recommend keeping WPA + WPA2 encryption to avoid some devices on the network malfunctioning.
- Set the password for accessing the WiFi network: change the value in the Chiave di rete wireless (Wi-Fi network key) field.
Click Applica (Apply) for the changes to take effect.
If you intend to change other options and configurations in this section, you can consult the technical support section of the AVM website. Its search engine and FAQs provide all the information you need to configure this section. To access the site, use the following address:https://it.avm.de/assistenza/fritzbox/fritzbox-7430/panoramica/
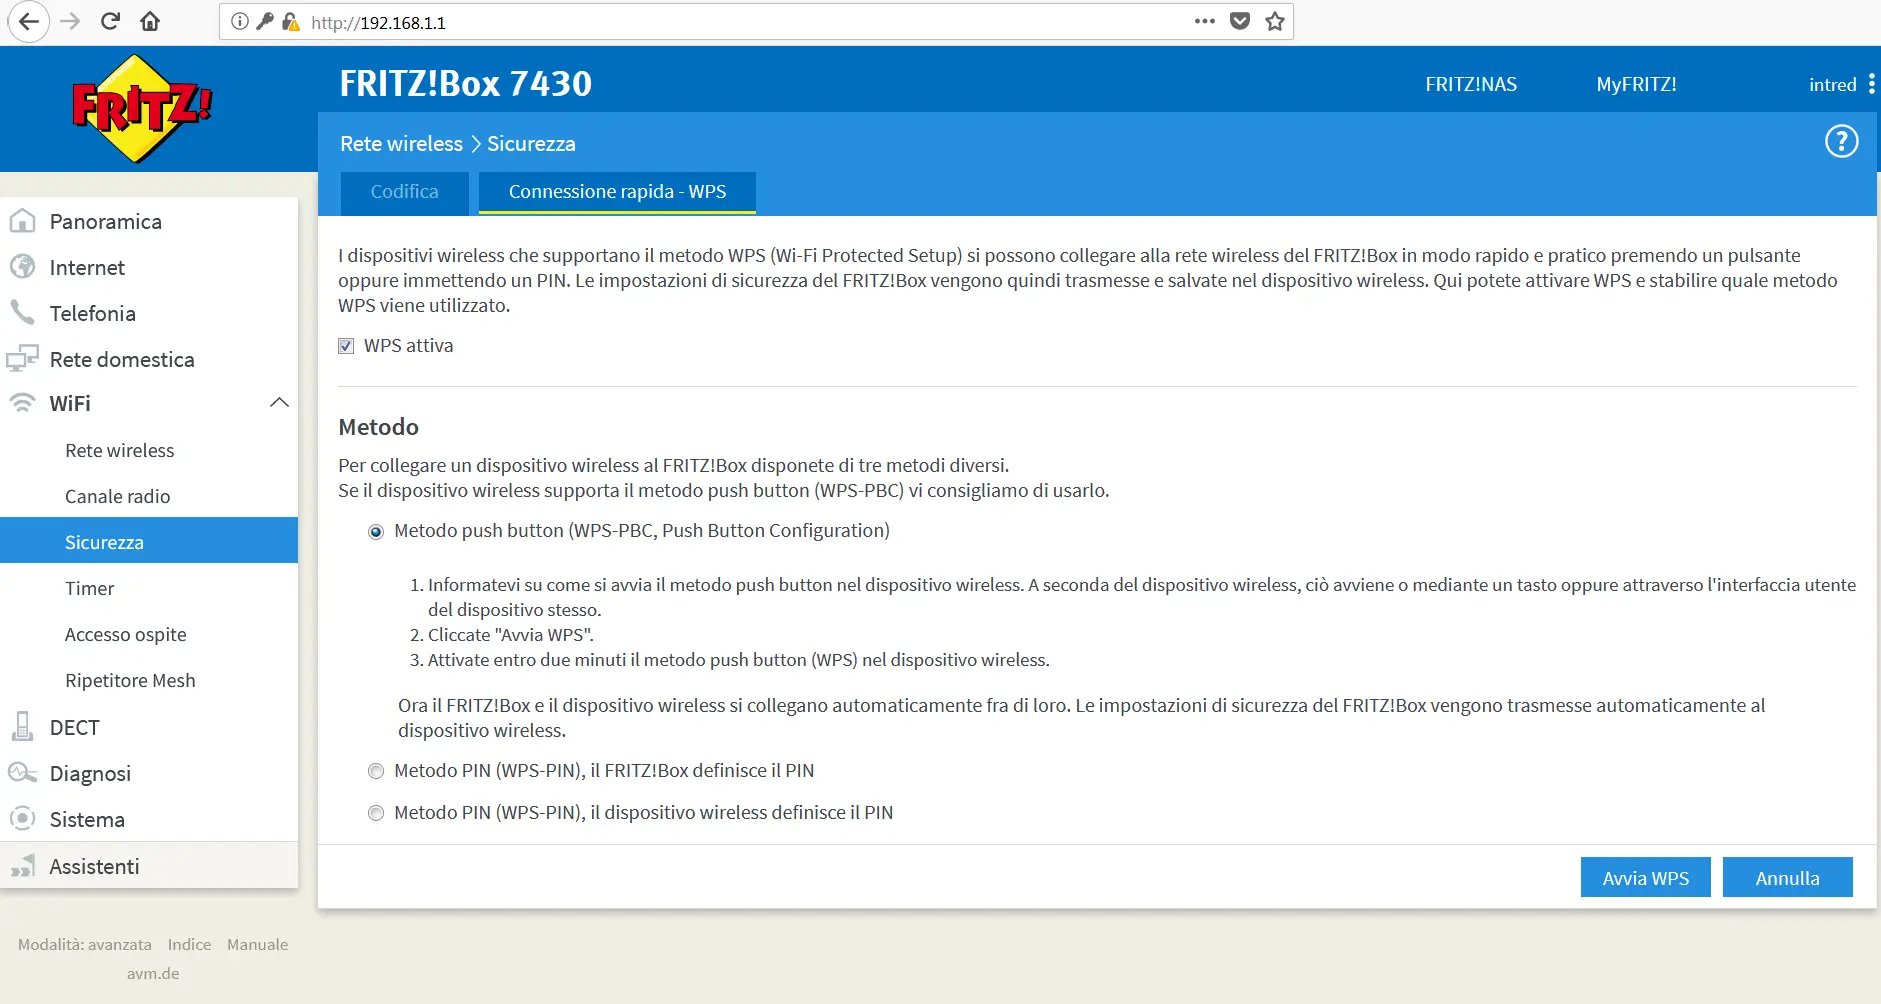
To allow a device to synchronise via the WPS protocol, click Connessione rapida - WPS (WPS Quick Connection) (the default setting uses the push-button method).
For more details, you can consult the technical support section of the AVM website. Its search engine and FAQs provide all the information you need to configure this section. To access the site, use the following address: https://it.avm.de/assistenza/fritzbox/fritzbox-7430/panoramica/
TIMER
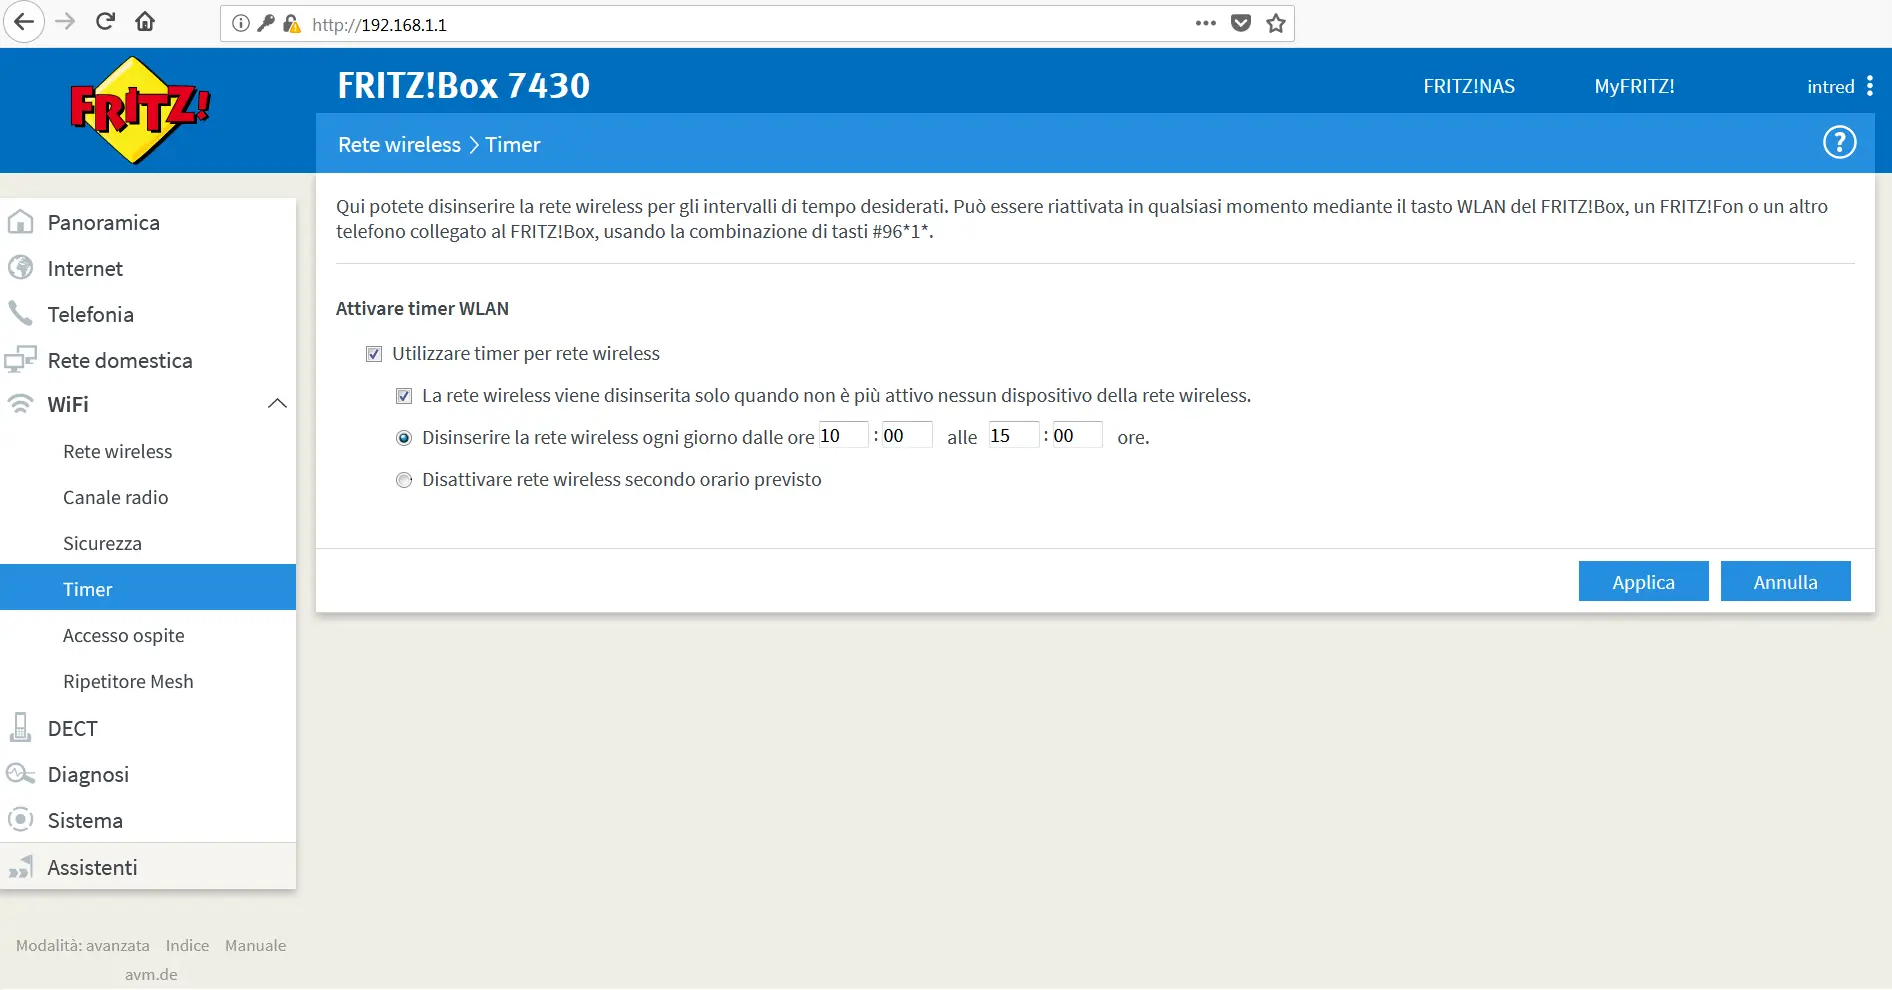
In the menu bar on the left, click WiFi -> Timer.
In this section you can switch the wireless network off or on only during specific time slots of your choice.
Tick Utilizzare timer per rete wireless (Use timer for Wi-Fi network) to enable the option.
Fill in the fields as required and finally click Applica (Apply).
GUEST ACCESS
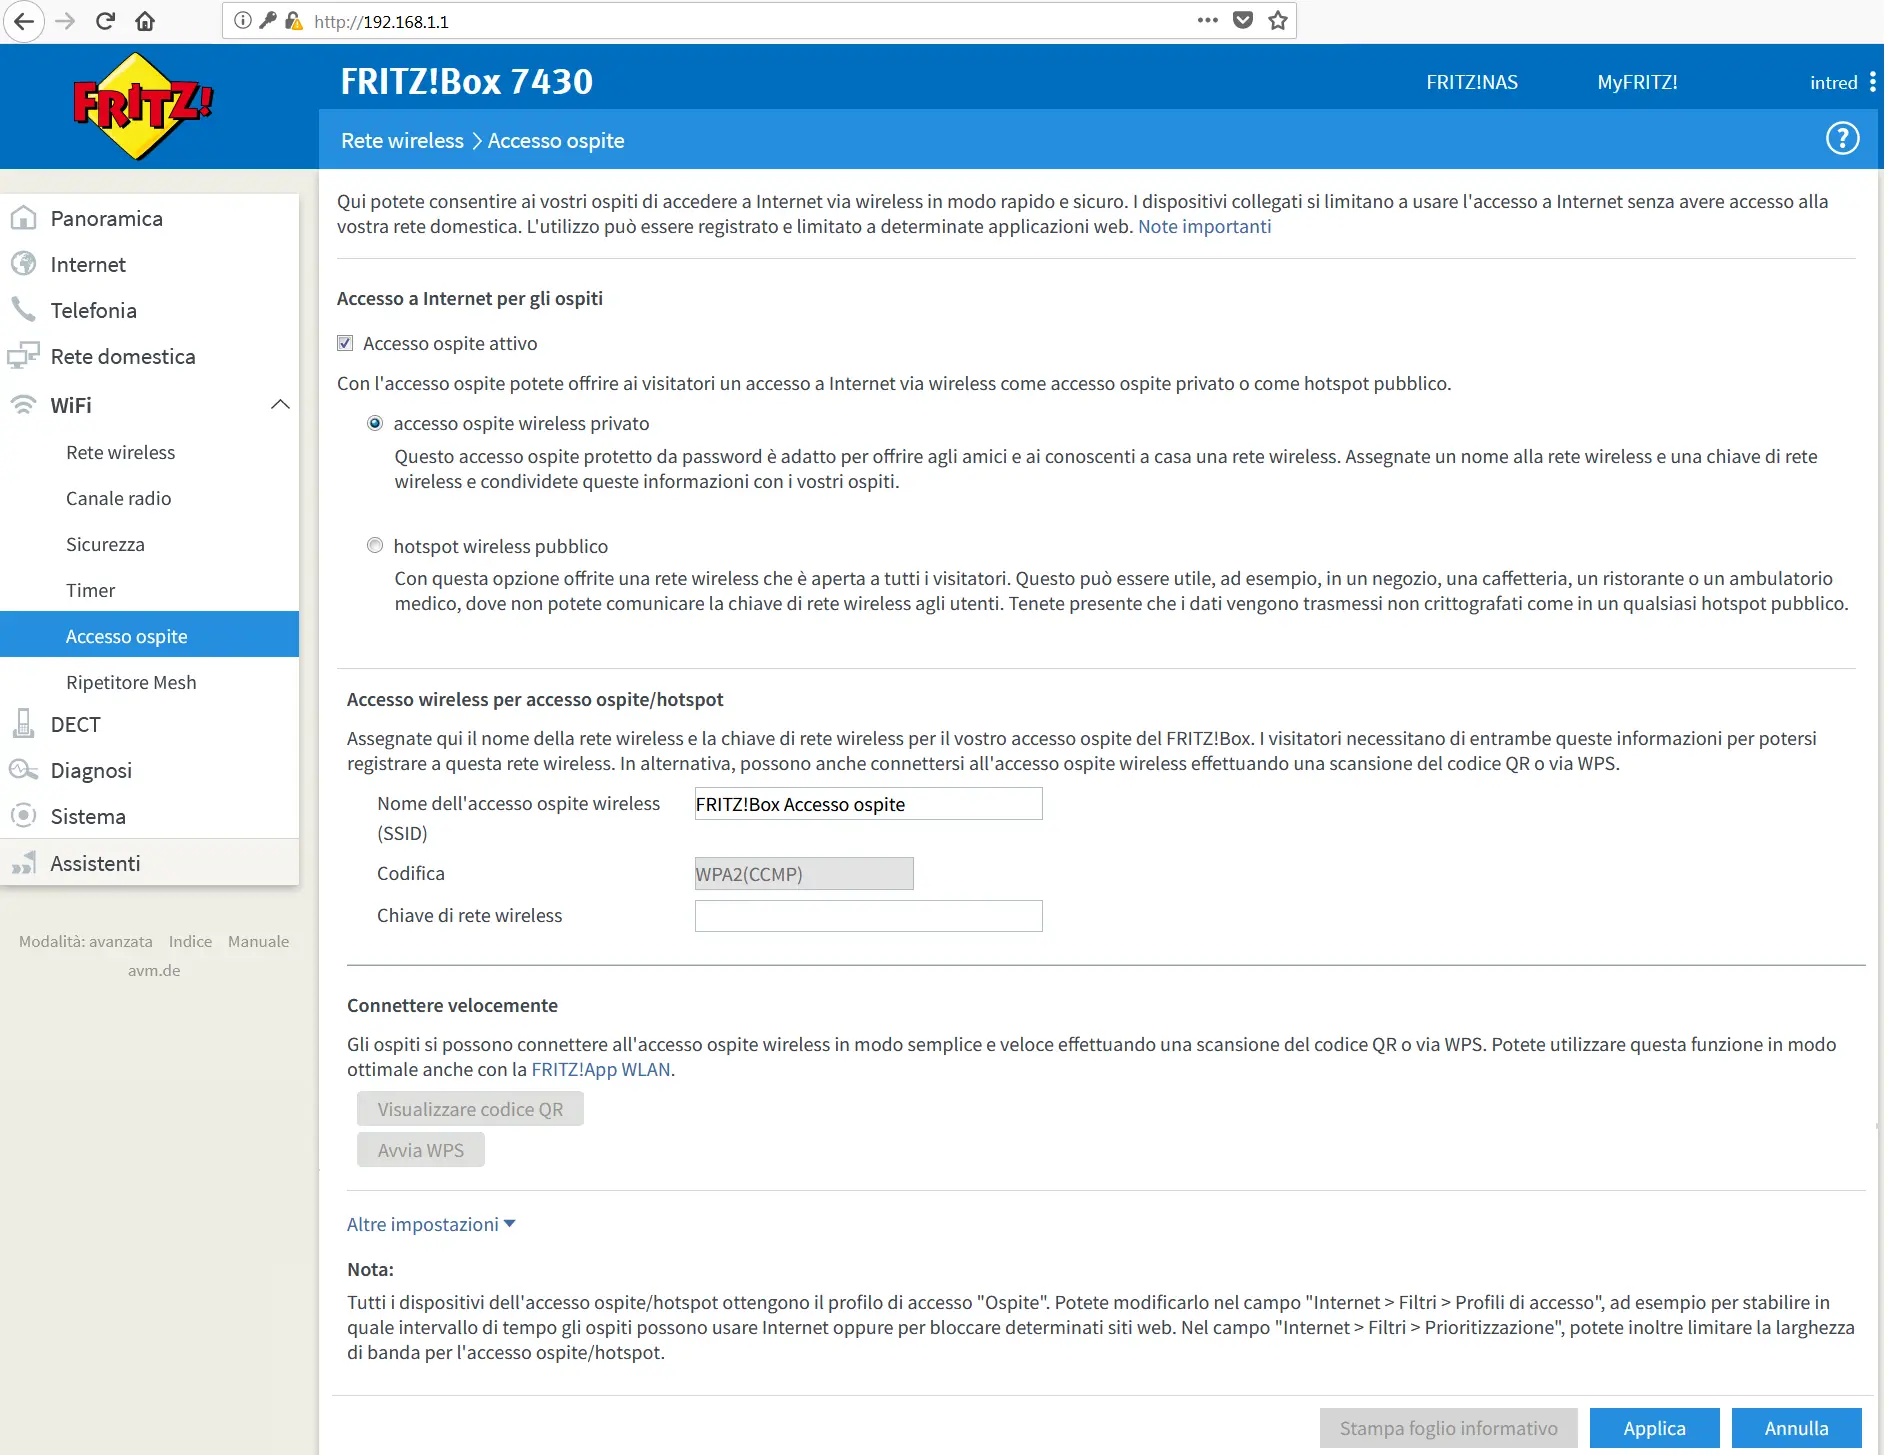
In the menu bar on the left, click WiFi -> Accesso Ospite (Guest Access).
In this section you can create a second wireless network for guest devices to access.
Tick the Accesso ospite attivo (Guest access enabled) option to enable access. Set the network name by filling in the Nome dell'accesso ospite wireless (SSID) (Name of the guest Wi-Fi network (SSID)) field. Finally, set the guest network password by filling in the Chiave di rete wireless (Wi-Fi network key) field. To change and configure advanced guest access settings, click Altre impostazioni (Further settings) and proceed as required. Finally, click Applica (Apply).
INTERNET SECTION
ABILITAZIONI (PERMIT ACCESS) - PORT OPENING
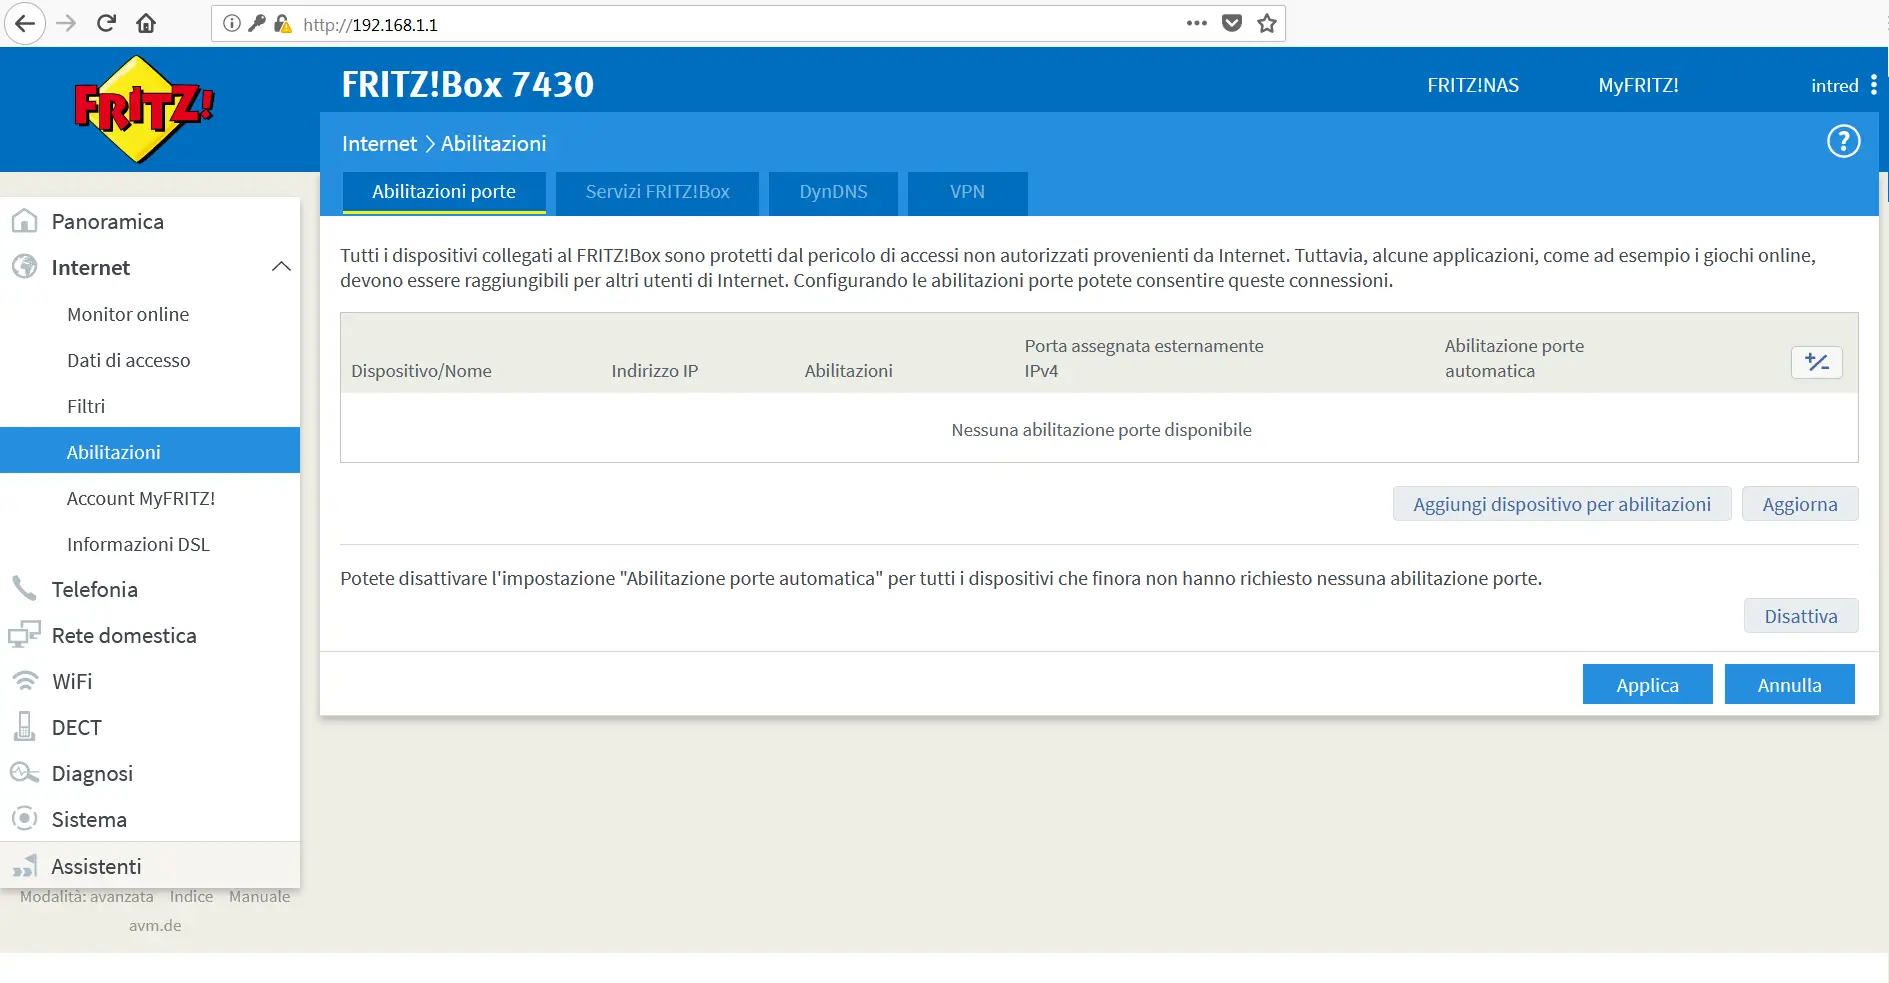
In the menu bar on the left, click Internet -> Abilitazioni (Permit Access).
Intred residential lines are currently configured with NAT (private IP/shared public IP). As a result, the configurations applied in the Abilitazioni porte (Port Sharing) section (port opening) may not work even if they are set correctly. If, after port opening has been set correctly, the services still do not work properly, you will need to contact Intred Sales Support and subscribe to the Static Public IP service.
Please remember that the current NAT configuration of the Intred line does not in any way prevent a normal browsing experience, and all Internet services remain fully usable.
Only proceed with the necessary configurations after subscribing to the Static Public IP service.
Then click Aggiungi dispositivo per abilitazioni (Add Device for Sharing).
Now, from the Dispositivo (Device) drop-down menu, select the device for which you need to create the permissions (port opening).
If the device is not connected to the FRITZ!Box router, select Immettere manualmente l'indirizzo IP (Enter IP address manually) from the drop-down menu and fill in the Indirizzo IPv4 (IPv4 Address) field with the IP address of the device for which you need to create the permissions.
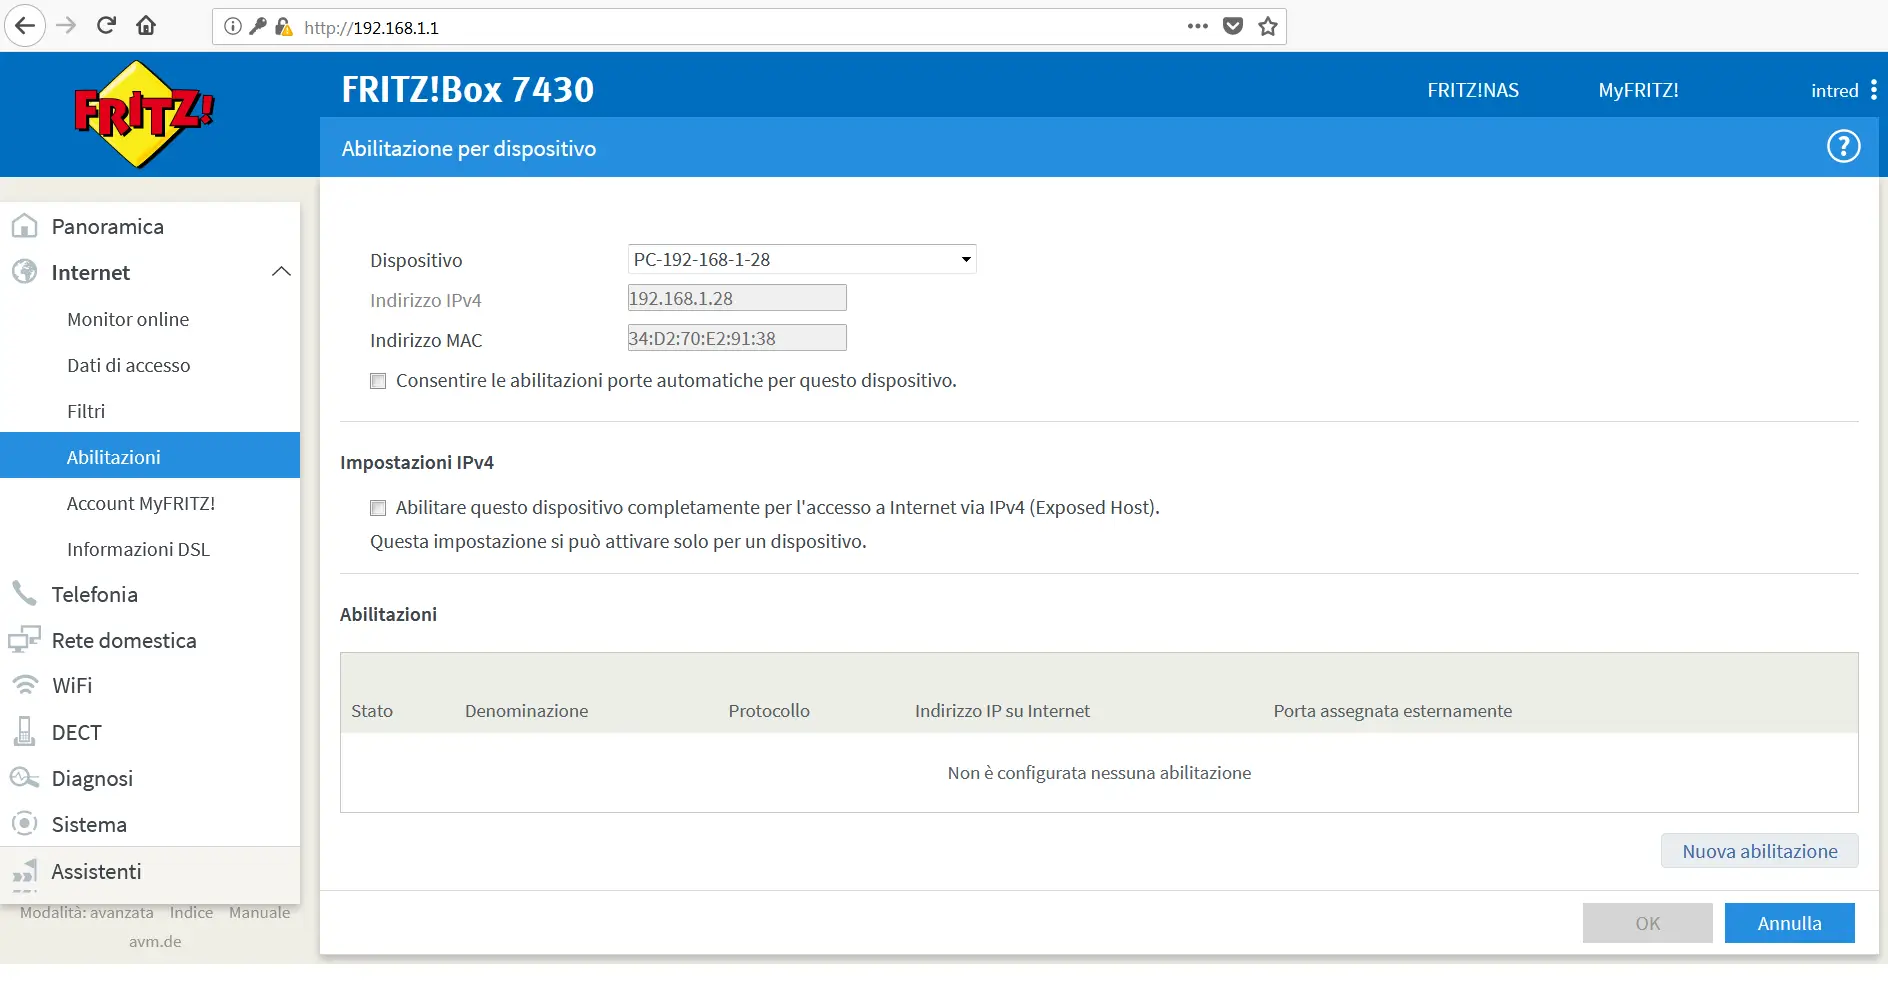
Please remember, in any case, that Intred does not know either the internal IP addresses set on your devices or the ports that need to be enabled for the various applications on the market, so you will need to obtain this information directly from the device itself and from the application provider.
Then click OK. You will return to the previous screen. Click OK again.
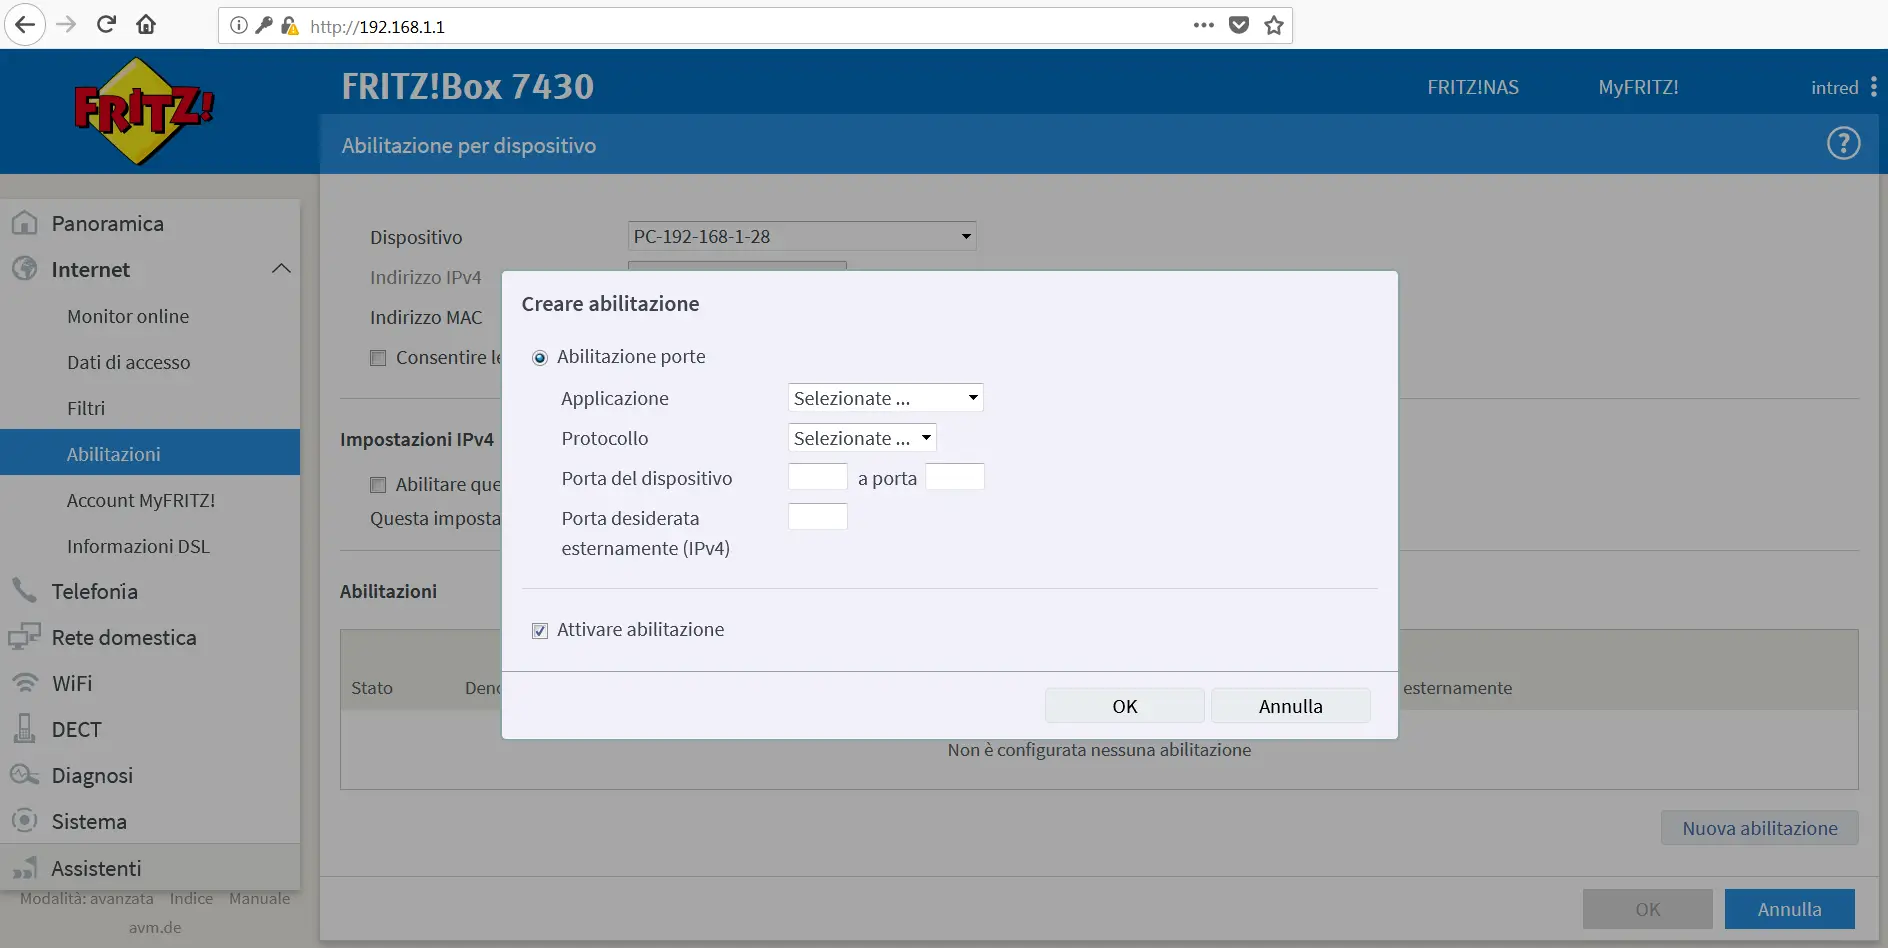
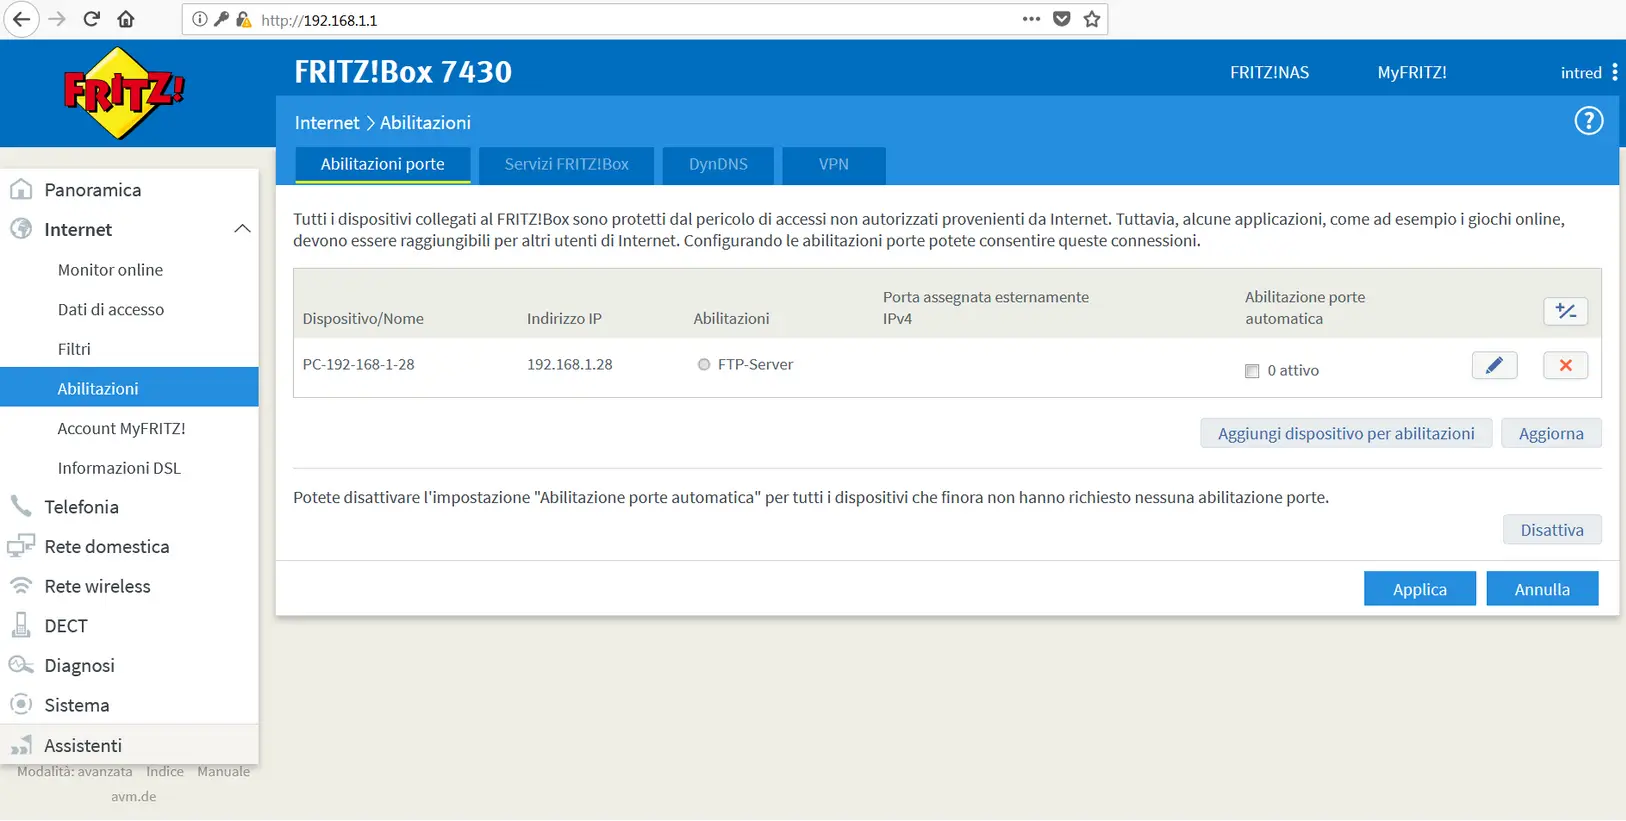
The initial Abilitazioni (Permit Access) screen will show the configurations applied for each device.
Click Applica (Apply) to save the configuration prepared in the previous steps.
If permissions have already been configured, you can edit or remove them: click the pencil or the red X respectively on the row for the chosen device and proceed as required.
Please remember that FRITZ!Box routers are configured by Intred for maximum line performance. We therefore advise against changing the device settings unless you know exactly what changes you are making.
Intred advises against changing any other configuration or parameter, apart from those listed above, so as not to cause stability or performance issues with the service provided.
For all options and sections not covered in this guide, you can consult the technical support section of the AVM website. Its search engine and FAQs provide all the information you need to configure this section. To access the site, use the following address: https://it.avm.de/assistenza/fritzbox/fritzbox-7430/panoramica/
For any problem strictly related to the device’s advanced configurations, you can also open a support request with AVM Italia via the following link: https://it.avm.de/assistenza/richiesta-di-assistenza/selezione-prodotti/